First things first, creating a Facebook ad account isn't just a box to check. It's the groundwork for tapping into one of the most powerful advertising engines ever built. This guide will walk you through setting it all up, but remember: choices like your currency and time zone are permanent, so think it through before you click.
Why a Flawless Ad Account Setup Is Your Secret Weapon in 2026

Think of your Meta ad account as the foundation of a skyscraper. Get it right, and you can build something massive. Get it wrong, and you'll be dealing with cracks and instability from day one. For any business serious about growth in 2026—whether you're a DTC brand just starting out or a seasoned agency—a clean, correct setup is absolutely non-negotiable.
The platform has come a long way from its early days of simply boosting posts. It’s now a complex, global ecosystem.
The Scale of the Opportunity
The numbers behind Meta's advertising platform are almost hard to believe. Global ad revenue is on track to blow past $230 billion in 2026, and that money is flowing in for one reason: it works. For performance marketers like us, the data speaks for itself.
- Mind-Boggling Reach: You’re tapping into an audience of over 3.07 billion monthly active users. The potential customer pool is immense, with huge markets like India boasting 384 million users alone.
- Impressive Efficiency: Even as the platform gets more crowded, efficiency is improving. On average, every $10 you spend on Facebook ads can reach around 2,520 users.
- Real Conversions: Talk is cheap, but sales aren't. We've seen conversion rates in e-commerce hit as high as 14.29%, proving the platform’s power to drive bottom-line results.
- Mobile Is Everything: It’s no surprise, but the numbers confirm it. Campaigns built for mobile can see a 52% higher click-through rate (CTR) than desktop-only ads. Your creative strategy has to be mobile-first.
This isn't just about running a few ads. It's about building a machine that can capitalize on this massive opportunity. A proper setup is the first, most critical step.
A correctly configured ad account is the wellspring of historical data. For modern AI-powered tools like AdStellar AI, this data is essential for automating campaign creation and scaling your results effectively.
From Manual Grind to Automated Growth
Not too long ago, marketers would spend endless hours manually building campaigns, poring over spreadsheets, and testing creatives one by one. The game has completely changed. Today, a well-structured ad account becomes a pristine data source that fuels powerful automation.
When you connect a tool like AdStellar AI through a secure OAuth integration, it doesn't just see your account—it sees your history. It can instantly analyze past performance to pinpoint your winning ads, best audiences, and most effective creative angles.
This transforms ad creation from a tedious, guess-driven process into a data-backed, scalable operation. Instead of wondering what might work, you can automate the creation of hundreds of ad variations based on what has worked. This is how the best growth teams are moving faster and getting better returns.
And it all starts with setting up your ad account the right way from the beginning. To dig deeper, check out our guide on the best practices for a high-performing Meta ads account structure.
Build Your Foundation in Meta Business Suite
Before you even think about creating a Facebook ad account, you have to build a proper home for it. The biggest mistake I see new advertisers make is skipping this step and jumping straight into running ads from their personal profile.
It’s a tempting shortcut, I get it. But mixing your business assets with your personal Facebook account is a recipe for disaster. It creates a messy, insecure setup that’s a nightmare to manage, impossible to scale, and a huge liability if you ever need to bring on a team member or an agency.
In the world of Meta, the proper foundation is the Meta Business Suite—what many of us old-timers still call Facebook Business Manager.
Why Business Suite Is Non-Negotiable
Think of the Meta Business Suite as the central command center for all your marketing assets. It’s a secure, professional space where you manage your Pages, Instagram profiles, pixels, and—most importantly—your ad accounts, completely separate from your personal life.
For a solo entrepreneur, this separation is a critical safeguard. If something goes wrong with an ad account (and trust me, it can), your personal profile is protected. For agencies, it's the only professional way to handle client work without creating a tangled mess of permissions and ownership.
The most important concept here is ownership. Assets created inside a Business Suite belong to the business itself, not to an individual’s personal Facebook profile. This simple distinction prevents massive headaches when people leave the company or you need to grant an agency access.
Starting with a Business Suite from day one ensures that as your business grows, your advertising operations can scale with it cleanly and securely.
Creating Your Meta Business Account
Alright, let's get this set up. The first real step is creating the business-level account itself.
Head over to business.facebook.com/overview to get started. You'll need to log in with your personal Facebook profile, but don't worry. This is just for verification—it’s like using your driver’s license to get into an office building. It doesn't mean your business is tied to your personal profile's fate.
You’ll be asked for some basic info:
- Your Business Name: Use your official business name. This is for Meta's records and internal identification.
- Your Name: This will be pre-filled from your personal profile.
- Your Business Email: Always use a professional email from your own domain (e.g.,
you@yourcompany.com). Using a generic Gmail or Yahoo address can sometimes raise red flags with Meta's security systems.
Once that’s done, you'll have an empty, but secure, container. Now it’s time to fill it with your business assets.
Before you go any further, running through a quick checklist can save you a lot of backtracking. It ensures all your foundational pieces are in the right place before you connect everything.
Business Suite Setup Checklist
Here's a quick reference to make sure all the essential elements are in place before you move on to creating the ad account itself.
| Setup Step | What It Does | Why It's Critical |
|---|---|---|
| Create Business Account | Establishes the top-level container for all assets. | Separates business from personal profiles for security and ownership. |
| Add People & Assign Roles | Grants team or agency access with specific permissions. | Ensures secure collaboration without giving away full control. |
| Claim Business Page | Connects your Facebook Page to the Business Suite. | Establishes official ownership and enables advertising from your Page. |
| Connect Instagram Account | Links your professional Instagram profile. | Allows you to run ads and manage your Instagram presence from one place. |
| Add a Payment Method | Adds a credit card or other payment source to the business. | Required for running any paid advertising campaigns. |
This checklist covers the bare essentials. Getting these right from the start makes the rest of the process much smoother.
Claiming Your Essential Business Assets
With your Business Suite ready, the next move is to formally claim your key assets: your Facebook Page and your Instagram Professional Account. This action officially tells Meta that your Business Suite is the rightful owner and manager of these profiles.
Inside Business Settings, you'll see options like "Add a Page" or "Connect an Instagram Account." You'll face a few different scenarios, so it's crucial to pick the right one for your situation.
| Action | When to Use It | Key Consideration |
|---|---|---|
| Add a Page | You are the owner/admin of the Page. | This permanently moves the Page into your Business Suite. It's the standard action for your own business. |
| Request Access to a Page | You are an agency or contractor. | You are asking for permission to work on a Page owned by another business. Ownership does not change. |
| Create a New Page | You are starting from scratch. | You can create a new business page directly inside your Business Suite, which is the ideal way to do it. |
Claiming your assets is a must-do step before you create a Facebook ad account. It establishes the connections needed for advertising, like running ads that appear to come from your Page or promoting your Instagram posts. For a more detailed walkthrough, our complete guide on the Meta Business Suite setup breaks down every nuance.
By taking the time to build this foundation correctly, you set the stage for a scalable and professional advertising operation. Your future self—and anyone you work with—will thank you.
Creating Your New Facebook Ad Account
Alright, you've got your Meta Business Suite set up. Now for the main event: creating the actual ad account. This is your command center—where campaigns are born, budgets are managed, and performance data lives.
Getting this part right from the start saves you from a world of headaches later on. We've all seen accounts set up in a rush, only to cause massive reporting and access issues down the line. So let's walk through this the right way, whether you're a brand new DTC shop or an agency onboarding your tenth client this month.
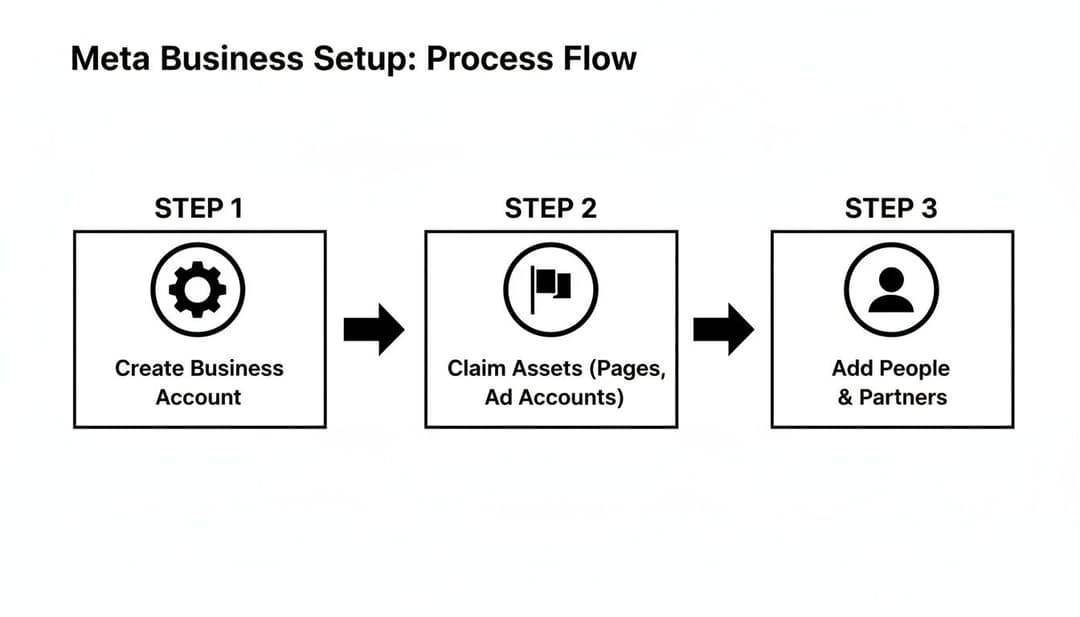
This flowchart nails the proper sequence. First, you create the business account, then you claim your assets (like your Page), and then you add people and create ad accounts. Following this order is crucial for avoiding the ownership tangles and permission errors that can completely derail your advertising.
The Ad Account Creation Dialog
Inside your Meta Business Suite, head over to Business Settings and find Ad Accounts in the menu. Click that blue "Add" button, and you'll see a few choices. We're going to focus on the one you'll use 99% of the time: "Create a new ad account."
This pops up a simple-looking dialog box, but don't be fooled. The choices you make here are critical.
You’ll be asked for three key pieces of information:
- Ad account name: What you'll call the account.
- Time zone: The primary time zone for your business operations and reporting.
- Currency: The currency you'll be billed in and use for all reporting.
Now, pay close attention to those last two. They’re a much bigger deal than they seem.
CRITICAL: Your chosen Time Zone and Currency are permanent. Once the ad account is created, you can never change them. Get it wrong, and your only option is to deactivate the account and start over from scratch.
I’ve seen this happen. An agency in New York (EST) sets up an account for a client in London (GMT) but forgets to change the time zone. Suddenly, all their campaign schedules are five hours off, and daily reports don't align with the client's actual business day. It creates an absolute mess for performance analysis. Always, always confirm these details with your client or stakeholders first.
Naming Conventions for Long-Term Sanity
When you're just starting out, naming your account "My Business Ads" feels perfectly fine. But trust me, once you start managing multiple accounts, or if you're an agency, that approach leads to chaos. A smart naming convention is non-negotiable for staying organized.
Here are a few a few battle-tested examples:
- For a DTC Brand:
[Brand Name] - [Region/Currency]->GlowSkin - USA (USD) - For an Agency:
[Client Name] - [Brand Name] - Ad Account->Acme Agency - GlowSkin - Ad Account - For a New Market:
[Brand Name] - [Country/Currency]->GlowSkin - UK (GBP)
This simple format tells you everything you need to know at a glance, which is a lifesaver when you're jumping between accounts. After you plug in these details, Meta will ask who the account is for—make sure you select "My business."
Linking Your Ad Account to Your Page
The last step in this initial setup is assigning people and connecting your assets. You'll be prompted to add users from your Business Manager and set their permissions. Give yourself, and any other key team members, "Manage ad account" access. This is full admin control.
Most importantly, you need to link this new ad account to the correct Facebook Page. This is the step that officially authorizes your ad account to run ads on behalf of that Page. If you skip this, you’ll get to the campaign creation stage and find you can't select your Page from the dropdown.
Getting this process right is what opens the door to powerful results. Across industries, the average click-through rate (CTR) for Facebook lead generation ads is sitting around 2.65%, with an average conversion rate of 9.1%. These are the kinds of numbers marketers are chasing, and it all starts when you create a Facebook ad account properly.
With your new account created and configured, you're ready to tackle the money side of things. Before you can launch a single ad, you need to get a payment method on file. To get a head start, you can learn more about how to sign up for the Meta Ads platform in our related guide.
Adding Payment Methods and Verifying Your Business
You’ve got your new ad account, but before you can launch a single campaign, you need to give it a way to pay. This isn't just about plugging in a credit card number. It’s about building a stable financial foundation for all your advertising.
Honestly, one of the quickest ways to get a new ad account flagged or shut down is a failed payment. Meta’s automated systems are incredibly sensitive to payment issues, especially on accounts without a long, trusted history. Getting this right from the start saves you from some major headaches down the road.
Setting Up Your Primary and Backup Payments
Head over to the Billing & Payments section in your Business Suite. This is where you’ll add your primary payment source. While you can use PayPal, I almost always recommend a dedicated business credit card. It’s cleaner for bookkeeping and often racks up points or cashback on your ad spend.
But here's a pro tip: never rely on just one payment method. I’ve personally seen six-figure-a-day campaigns grind to a halt because a bank’s fraud algorithm randomly froze the primary card. It’s a nightmare.
This is why a backup payment method is non-negotiable. Add a second credit card or a PayPal account. If the primary one fails for any reason, Meta will automatically try the backup, and your ads will keep running without missing a beat.
A paused campaign doesn't just stop generating results; it loses all its momentum. When you restart it, the algorithm has to go back into the learning phase, which can spike your costs and kill your performance for a while. A backup payment method is cheap insurance against that chaos.
Beyond just adding a card, knowing how to securely integrate payment gateway systems is a core skill for any serious digital business. Your financial operations are the bedrock of everything you do online.
Understanding Business Verification
With your payment info locked in, there's one more hurdle to clear to really unlock your account's potential: Business Verification. This is simply you proving to Meta that your business is a real, legitimate entity.
A few years ago, this was optional. In 2026, it's essential. Without verification, you’re basically operating with one hand tied behind your back. Verification is the key to unlocking critical features.
- Increased Ad Account Limits: Verified businesses can create more ad accounts, which is crucial for agencies or brands running multiple initiatives.
- Advanced API Access: If you want to use powerful third-party tools like AdStellar AI, you need the API access that verification provides.
- Brand Safety Tools: Get more control over where your ads appear and protect your brand’s reputation.
- Restored Access: If your account ever gets restricted (and it happens), being verified dramatically increases your odds of a successful appeal.
Verification is all about building trust with the platform. It shows Meta you're a serious advertiser, not a fly-by-night operation. That trust becomes priceless when you need support or run into an account issue.
How to Prepare for a Smooth Verification
The verification process can feel a little bureaucratic, but a bit of prep makes it painless. You'll need to submit official documents confirming your business's legal name, address, and phone number.
Before you even click the "Start Verification" button, get your documents in order.
- Legal Business Documents: This can be your Articles of Incorporation, a business license, or a tax certificate. The document must show your official business name and physical address.
- Proof of Address: A recent utility bill (like power or internet) or a bank statement works perfectly, as long as it has the business name and address on it.
- Domain Access: You'll also need to prove you own your website's domain, usually by uploading an HTML file or adding a DNS record.
The number one reason for rejection is mismatched information. If your business license says "123 Main Street" but you entered "123 Main St." in your Business Suite, you’ll probably get denied. Double-check that every single detail on your documents exactly matches the information in your Meta Business account. This simple check can save you weeks of back-and-forth and help you successfully create your Facebook ad account.
Manage User Roles and Grant Secure Partner Access

Your new Facebook ad account is ready to go—verified, funded, and live. Now comes a crucial step that many marketers overlook: handing out the keys. This isn't just a formality; it's the foundation of a secure and efficient team.
Giving everyone full admin access is a recipe for disaster. But being too restrictive can create bottlenecks that grind your entire marketing engine to a halt. The real goal is to give each person the least amount of access they need to get their job done. It’s the gold standard for a reason—it protects your account and keeps things running smoothly.
Matching Roles to Responsibilities
Inside Business Suite, you’ll find several predefined roles. Think of them as different sets of keys, each unlocking specific doors in your ad account. Handing out the wrong set can lead to costly mistakes, like a junior team member accidentally nuking a budget or an analyst getting lost in campaign creation tools they don't need.
It's all about clarity and control. Here's a look at the most common roles and who they're built for.
Ad Account User Roles and Permissions
Understanding who gets what permission is non-negotiable for a well-run team. This table breaks down the core roles so you can assign them with confidence.
| User Role | Key Permissions | Best For |
|---|---|---|
| Admin | Full control: manages campaigns, billing, users, and permissions. The "master key." | Business owners, heads of marketing, or the primary agency lead managing the entire account. |
| Advertiser | Can create, edit, and view ads and access reports. Cannot manage users or payment methods. | Media buyers, campaign managers, and anyone actively running ads day-to-day. |
| Analyst | View-only access to campaign performance and reports. Cannot make any changes. | Finance teams tracking ad spend, strategists needing data, or stakeholders who just need to see results. |
Assigning the right permissions from day one prevents slip-ups and keeps your account secure. It’s even more critical if you’re an agency juggling multiple clients. For more on that, our guide on how to manage multiple Facebook ad accounts is an essential read.
Think of it this way: you wouldn't give the office intern the keys to the company safe. Likewise, a creative designer who only needs to access the asset library doesn't need admin-level permissions on your multi-million dollar ad account.
Granting Secure Access to Partners and Tools
The same principles apply when you bring in outside help, whether it’s an agency or a new software platform. You have two primary—and secure—ways to do this: adding them as a "Partner" or connecting via OAuth.
When you work with an agency, add them as a Partner. This is far more secure than adding their individual employees as users on your account. The agency manages its own team's access, so if an employee leaves, it's their responsibility to revoke permissions, not yours.
For connecting third-party tools like AdStellar AI, the process is even more streamlined and secure, using a method called OAuth (Open Authorization).
In simple terms, OAuth is like a digital valet key.
Instead of giving a platform your Facebook password (which you should never do), you grant it specific, limited permissions to act on your behalf. You’ll see a pop-up from Meta asking if you "allow AdStellar AI to access your ad campaigns and performance data."
This password-free method is the security gold standard for a few key reasons:
- You never share your credentials. Your password stays private and secure.
- Access is limited. The tool can only do what you’ve explicitly allowed it to do.
- You can revoke access anytime. With a single click in your Business Settings, you can cut off the connection instantly.
By giving a tool like AdStellar AI secure access, you empower it to analyze your historical data, find winning patterns, and automate campaign creation. This turns the ad account you just built into a dynamic growth engine, all while keeping your assets locked down.
Navigating the Tricky Questions of Ad Account Setup
When you're diving into the world of Meta ads, it’s not uncommon to hit a few snags right out of the gate. From a new account getting zapped without warning to wrestling with platform limits, these early hurdles can be incredibly frustrating.
Let's walk through some of the most common questions and sticking points I see advertisers face. Getting these foundational pieces right from the start will save you a world of headaches down the road.
Why Did My Brand New Ad Account Get Disabled Instantly?
This one causes the most panic, and for good reason. You meticulously follow all the steps, create your shiny new ad account, and before you can even launch a campaign, it's disabled. Take a deep breath—it's usually just an automated security flag.
Meta’s algorithms are hyper-vigilant about stopping spam and fraudulent activity. A brand-new account, especially one created in a new Business Manager, can sometimes look suspicious to the bots for a few simple reasons:
- Payment Method Quirks: A freshly added credit card, a small failed authorization charge you didn't notice, or even a mismatch between the name on your card and your Facebook profile can trigger a review.
- Bare-Bones Business Info: If you rushed through the setup and left your Business Info section in Meta Business Suite looking empty, the system might see your account as less legitimate.
- A History of Policy Issues: If your personal profile has had ads rejected or run into policy trouble in the past, that history can unfortunately follow you to new accounts you create.
Your very first move should be to head straight to Account Quality within your Business Manager. This dashboard will usually tell you why the account was flagged and provide a big blue button to "Request Review." When you submit your appeal, be polite and professional. Simply state that you're a legitimate business and believe the disablement was an error.
If you find yourself in this situation often, it's worth reading our deep dive on what to do about a disabled Facebook ads account.
How Many Ad Accounts Am I Allowed to Have?
When you first create a Meta Business Manager, you can only create one ad account. This is a deliberate bottleneck designed to prevent bad actors from spinning up hundreds of spammy accounts all at once. The good news is that this limit isn't permanent.
The catch? You have to earn an increase. The only way to raise your ad account limit is by actively and responsibly using your first account. Start running compliant ads and spending your budget.
After a few weeks of consistent, policy-abiding ad spend, Meta's system will typically increase your limit automatically—first to 5, then 10, and so on. It’s a trust-based system. Prove you’re a legitimate advertiser, and the platform will give you more room to grow.
Should I Use a Personal Ad Account or a Business Manager Account?
The answer to this is simple and non-negotiable: Always, always, always create your ad account inside a Meta Business Manager. Never use your personal ad account for business.
Your personal ad account is tied directly to your personal Facebook profile. If a payment ever fails or an ad gets flagged on that account, your entire personal profile could be restricted. That means you could be blocked from managing your Pages, participating in Groups, or even just scrolling your feed.
A Business Manager acts as a firewall, separating your business assets (your Pages, pixels, and ad accounts) from your personal profile. It’s the professional standard for a reason. It gives you far better security, lets you cleanly manage roles and permissions for team members or agencies, and is the only way to scale an advertising operation seriously.
Can I Change the Currency or Time Zone of My Ad Account?
Nope. Once an ad account is created, the currency and time zone are locked in forever. You cannot go back and edit them.
This is exactly why it’s so critical to slow down and double-check these two settings during the initial setup process. If you accidentally select the wrong ones, your only option is to deactivate that ad account entirely and start over with a new one. For agencies, this is a mission-critical detail—always confirm the correct time zone and currency with your client before you create their account to prevent massive reporting and billing headaches later on.
At AdStellar AI, we know that a solid foundation is the secret to scaling your ad performance. Once your account is set up correctly, our platform can securely connect via OAuth to analyze your data and help you generate hundreds of high-performing ad variations in minutes. Discover how AdStellar AI can help you launch and scale campaigns 10x faster.