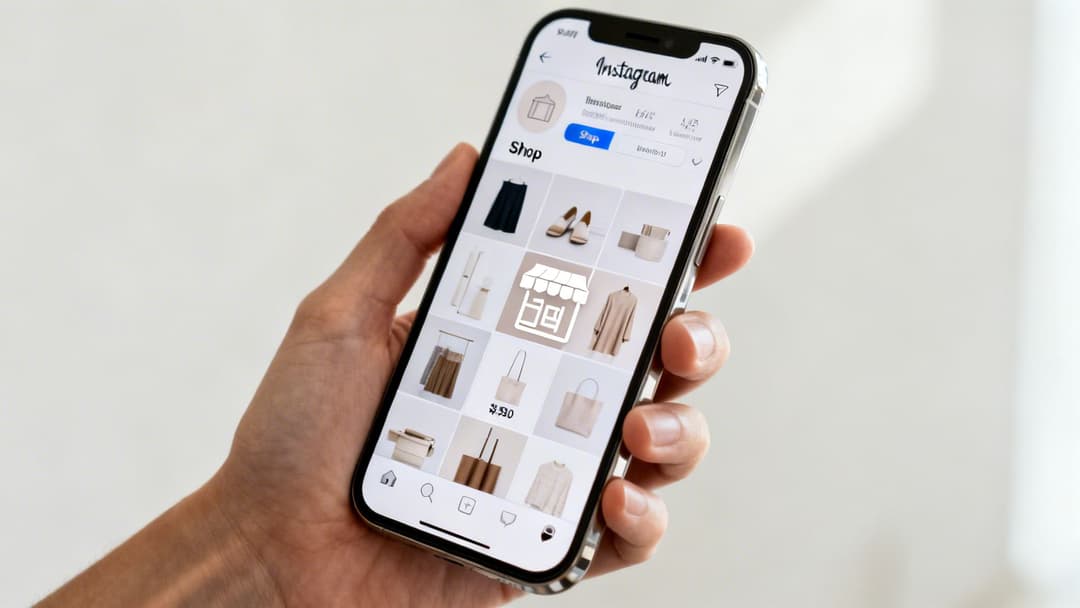
Setting up an Instagram Shop is like converting your profile from a simple brand billboard into a fully functional, clickable storefront. It’s the tool that closes the gap between a customer seeing something they love in your feed and actually buying it. By letting you tag products directly in posts, Reels, and Stories, you create a frictionless shopping experience right inside the app. For e-commerce brands, this is the single most effective way to capture high-intent buyers the second they feel that spark of inspiration from your content.
Why an Instagram Shop Is a Must-Have for E-Commerce Brands
In the e-commerce world, friction is the ultimate conversion killer. Every extra click, every new browser tab, every moment a potential customer has to leave an app to buy something is another chance for them to get distracted and abandon the purchase. An Instagram Shop slices right through that friction, turning your profile from a brand awareness tool into a powerful, integrated sales channel.
Let's walk through a real-world scenario. Your potential customers are scrolling their feed and see your new ceramic mugs styled in a cozy kitchen scene or your latest activewear being put to the test on a scenic hike. Without a shop, their journey is clunky: they have to remember your brand name, leave Instagram, open a browser, and search for your website. With a shop, they just tap the product tag and are instantly viewing a product detail page, ready to learn more or hit "buy."
From Passive Scrolling to Active Shopping
This immediate connection is the entire point of social commerce. It’s built to capitalize on impulse and inspiration by meeting customers exactly where they already are. And they’re definitely looking to buy—research shows that 44% of Instagram users shop on the platform weekly using features like product tags. Your audience isn't just killing time; they're actively searching for products and recommendations. An Instagram Shop makes sure you're ready when they find you.
The real power of an Instagram Shop lies in its ability to shorten the sales funnel dramatically. It transforms a 'like' into a lead and a 'share' into a sale, all within a few taps.
This seamless integration creates a clean, cohesive customer journey:
- Discovery: A user stumbles upon your product tagged in a Reel.
- Consideration: They tap the tag to check the price and details without ever leaving the video.
- Conversion: From there, they can head straight to your site to check out or, in some regions, complete the purchase directly within the Instagram app.
Amplifying Your Paid Advertising Efforts
For performance marketers, an integrated shop is an absolute game-changer. When you run ads featuring shoppable products, you're not just showing an ad—you're creating a direct, measurable path to conversion. This is especially true for brands using platforms like AdStellar AI, which can generate hundreds of ad variations to test dynamic creative at scale.
By linking these high-performing ads directly to your shoppable product pages, you build an incredibly effective sales funnel. The AI identifies the winning ad creative, and your Instagram Shop provides the frictionless checkout experience needed to turn that attention into revenue. The end result? A serious boost to your overall return on ad spend (ROAS).
Your Pre-Launch Checklist For a Smooth Setup
Before you jump into the exciting part of setting up your Instagram Shop, a little groundwork can save you a world of headaches and delays down the road. Think of this as your pre-flight checklist. Ticking these boxes now makes sure you meet all of Meta's core requirements for a smooth and successful launch.
First things first, your account needs to be set up for business. If you’re still rocking a personal profile, it's time to switch to an Instagram Professional Account. This is a non-negotiable step that unlocks all the business tools you'll need, including the ability to create a shop.
You can pick between a "Business" account, which is perfect for most retailers and brands, or a "Creator" account, which is better suited for influencers and public figures. The switch is easy and instantly gives you access to the analytics and features essential for e-commerce.
Confirm Your Eligibility and Location
Instagram Shopping isn’t available everywhere, and you can’t sell just anything. Before you get too far, you need to confirm two critical things:
- Supported Market: Your business has to be physically located in a country where Instagram Shopping is supported. Meta updates this list pretty regularly, so it's always smart to check their official documentation if you're not sure.
- Eligible Products: You must be selling physical goods that align with Meta's Commerce Policies. This means no services, digital products, or other restricted items.
These rules are enforced strictly. Getting this wrong is one of the fastest ways to have your shop application denied, so taking a few minutes to verify this now will prevent a lot of wasted time later.
Link to a Facebook Business Page
Your Instagram account doesn't live on an island. It needs to be officially connected to a Facebook Business Page. This connection is the critical link between your Instagram profile and the entire Meta ecosystem, especially the all-important Commerce Manager.
Just make sure the Facebook Page you link is the official one for your business and that you have admin access. This simple step authenticates your business and acts as the bridge for managing your catalog and sales across both platforms.
The power of social commerce is impossible to ignore. Instagram's shopping features pulled in an incredible $37.2 billion in global revenue in 2024. More than 25 million businesses are using these tools to connect with an audience where 90% of users follow at least one business. You can find more detailed stats about this on scocial.com.
Get Acquainted with Commerce Manager
The Meta Commerce Manager is your new command center. It's the central hub where you’ll manage absolutely everything related to your shop—from building your product catalog and tracking inventory to overseeing your entire sales operation.
Getting familiar with its layout and functions is key to your success. This is where you'll decide how customers check out, whether that's on your website or directly within the app (if that feature is available in your region). For a deeper dive, check out our detailed guide on the Meta Business Suite for deeper insights.
To make sure you've got all your ducks in a row, use this quick checklist to confirm everything is in order before you move on.
Instagram Shop Eligibility Checklist
This table is a quick way to double-check that you've covered all the essential prerequisites. If you can answer "Yes" to everything here, you're in great shape to start the setup process.
| Requirement | Status (Yes/No) | Key Action/Note |
|---|---|---|
| Professional Account | Convert from a personal profile in your Instagram settings. | |
| Facebook Page Linked | Connect to your official business page via Instagram's 'Edit Profile' section. | |
| Supported Region | Confirm your country is on Meta's list of supported markets. | |
| Eligible Products | Review Commerce Policies to ensure your physical goods are compliant. | |
| Verified Business Domain | Ensure your website domain is verified in Meta Business Manager. |
Once you've checked off every single item on this list, you're officially ready to tackle the most important phase: building the product catalog that will bring your new shop to life.
Building and Syncing Your Product Catalog
Think of your product catalog as the digital heart of your Instagram Shop. It’s not just a list of items—it’s the dynamic inventory system that tells Instagram exactly what you’re selling, how much it costs, and if it's in stock. Getting this right from the start is non-negotiable for a shop that runs smoothly and keeps customers happy.
Everything comes together in the Meta Commerce Manager. From there, you have two main options for building out your catalog: you can go the manual route with a data feed, or you can set up an automated sync with your e-commerce platform. Your best bet really depends on how many products you have, your comfort level with spreadsheets, and how much time you want to spend on upkeep.
This diagram breaks down how all the pieces connect—linking your accounts is the first step to powering your shop with a solid catalog.
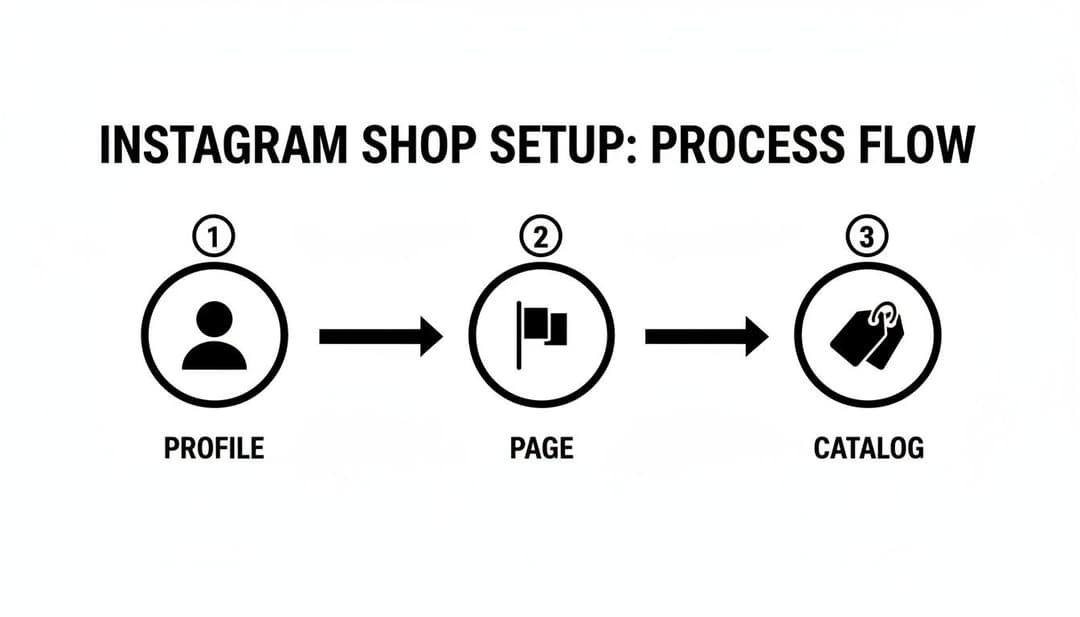
As you can see, your Instagram Profile, Facebook Page, and Product Catalog are all interlinked. If one piece is missing or misconfigured, the whole system for social selling falls apart.
The Manual Data Feed Method
If you have a small, fairly stable inventory, starting with a manual data feed is a totally viable option. This basically means creating a spreadsheet (a CSV or Google Sheet works) that lists out all your product information in a very specific, structured format. It’s like a detailed manifest for your entire product line.
You have to be meticulous here. Upload errors are incredibly common with this method because Meta’s system is extremely particular about formatting.
Make sure your data feed has these essential columns, formatted correctly:
- id: A unique SKU or product identifier that never changes.
- title: Your product’s name (e.g., "Organic Cotton Crewneck Tee").
- description: A compelling, keyword-rich product description.
- availability: Set this to
in stock,out of stock, orpreorder. - condition: Usually
new,refurbished, orused. - price: Must include the currency code (e.g.,
19.99 USD). - link: A direct URL to that specific product's page on your website.
- image_link: A direct link to a high-quality product image file.
A common tripwire is using the wrong image URLs. The link has to go directly to the image file itself (ending in .jpg or .png), not just the product page where the image lives. Once your sheet is perfect, you upload it directly into Commerce Manager. The big drawback? It’s completely manual. Every time a price changes or something goes out of stock, you have to edit the spreadsheet and re-upload it.
Syncing with an E-commerce Platform
For most businesses, especially if you're managing more than a handful of products, integrating your e-commerce platform is by far the better way to go. This approach creates a live, automated connection between your online store and your Instagram Shop. Platforms like Shopify, BigCommerce, and WooCommerce have made this incredibly simple with built-in integrations.
If you’re on Shopify, for example, the process is ridiculously efficient. You just add the "Facebook & Instagram" app as a sales channel in your dashboard. From there, it walks you through connecting your Meta Business account and choosing which products you want to sync over.
The real magic of an e-commerce integration is that inventory management becomes a "set it and forget it" task. When a product sells out on your website, it's automatically marked as out of stock on Instagram. This prevents overselling and saves you from a ton of customer service headaches.
This kind of synchronization is a massive time-saver. Think about running a flash sale where you need to update prices on 50 products. With a manual feed, that's hours of tedious spreadsheet work. With a platform integration, you make the change once in Shopify or BigCommerce, and it ripples across your entire social commerce setup automatically.
Choosing Your Platform Integration
Connecting your store is usually a guided, step-by-step process within your e-commerce dashboard. Here’s a quick look at how it generally works for the two biggest players.
For Shopify:
- From your Shopify admin, head to "Sales Channels" and click to add "Facebook & Instagram."
- Follow the on-screen prompts to connect your Facebook account and the right Business Manager.
- Select the products you want to sell on Instagram, and let the system handle the sync.
For BigCommerce:
- Go to the "Channel Manager" area in your BigCommerce dashboard.
- Find the "Facebook & Instagram" channel and click to connect it.
- Authenticate your Meta accounts and configure your sync settings as prompted.
The first sync can take anywhere from a few minutes to an hour, just depending on how large your catalog is. Once it’s done, you'll see all your products populated in Commerce Manager, ready for the final review.
This automated catalog is also the backbone for running powerful dynamic product ads. For businesses scaling their paid advertising, understanding how this catalog data fuels ad systems is crucial. You can dive deeper into this by exploring a Meta Ads API integration guide, which breaks down how this data powers more advanced campaigns.
Getting Your Instagram Shop Approved
You’ve built your catalog and connected all the right accounts. Now comes the slightly nerve-wracking part: hitting that "submit for review" button. It’s a bit like sending your kid off to their first day of school—you’ve done all the prep work, but now it’s in Meta's hands to give you the green light.
This is where Meta verifies that your business is legit and that you’re set up to give customers a great experience. Be prepared to wait a bit. While some shops get the thumbs-up in as little as 24-48 hours, it can easily stretch to a week or more. The key here is patience. Don't keep resubmitting your application; it just pushes you to the back of the line.
So, what’s happening behind the curtain? A real person at Meta is vetting your entire setup to make sure it meets their social commerce standards. They’re basically looking for trust and compliance.
What Meta’s Review Team Actually Checks
This isn’t just a bot scanning for keywords. Reviewers are trained to spot red flags that could lead to a bad or unsafe shopping experience for their users. They’re laser-focused on a few core areas to validate your business.
Here's what’s on their inspection list:
- Commerce Policy Adherence: This is the big one. They'll scan your catalog to make sure you aren't selling anything on their restricted list, like services, digital downloads, weapons, or other no-go items.
- Website Functionality and Trustworthiness: Your website needs to be a fully functional, professional-looking e-commerce store. Reviewers will click around, checking for broken links, placeholder text, and an easy-to-find return policy. A half-finished site is a huge red flag.
- Domain Verification: Meta needs proof that you actually own the website you’ve linked. This is a simple but crucial step inside Meta Business Manager. A surprising number of people skip it, and it's a common reason for rejection.
- Account Authenticity: Your Instagram and Facebook accounts need to look like real, active businesses. If your profile has zero posts, no followers, and looks like it was created five minutes ago, they’ll get suspicious and likely deny you.
Think of it this way: Meta is guarding its users. They want every shop on the platform to be credible and reliable. A trustworthy shop benefits you, the customer, and Meta. It's a win-win-win.
Common Reasons for Rejection (and How to Fix Them)
Getting that "rejected" notification is a bummer, but it's almost always due to an avoidable mistake. If you know the common pitfalls, you can sidestep them and get approved on the first try. The most frequent culprit is a simple misunderstanding of the rules. For a deep dive, you should really get familiar with the official guidelines on Meta’s advertising and commerce policies.
Here are the top reasons shops get turned away:
- Selling Ineligible Products: This is the #1 cause of rejection, hands down. Selling things like custom design services or digital courses isn't allowed, even if it feels like a product. Solution: Scrutinize the policy list and pull any non-compliant items from your catalog before you submit.
- Unverified Business Domain: If you haven’t proven you own your website URL in Business Manager, it’s an almost guaranteed denial. Solution: Head to the "Brand Safety" section in your Business Settings and follow the steps to verify your domain. It only takes a few minutes.
- Inconsistent Information: Your business name, address, and contact info need to be identical across your Instagram profile, Facebook Page, and website. Any discrepancies look sketchy to a reviewer. Solution: Do a quick audit. Make sure every detail matches up perfectly, right down to the spelling and punctuation.
How to Turn Your Instagram Feed Into a Storefront
Alright, your shop is approved and the catalog is synced. Now for the fun part—turning your content into a seamless shopping experience. The goal is to weave your products so naturally into your feed that every post, Story, and Reel becomes a direct path to purchase.
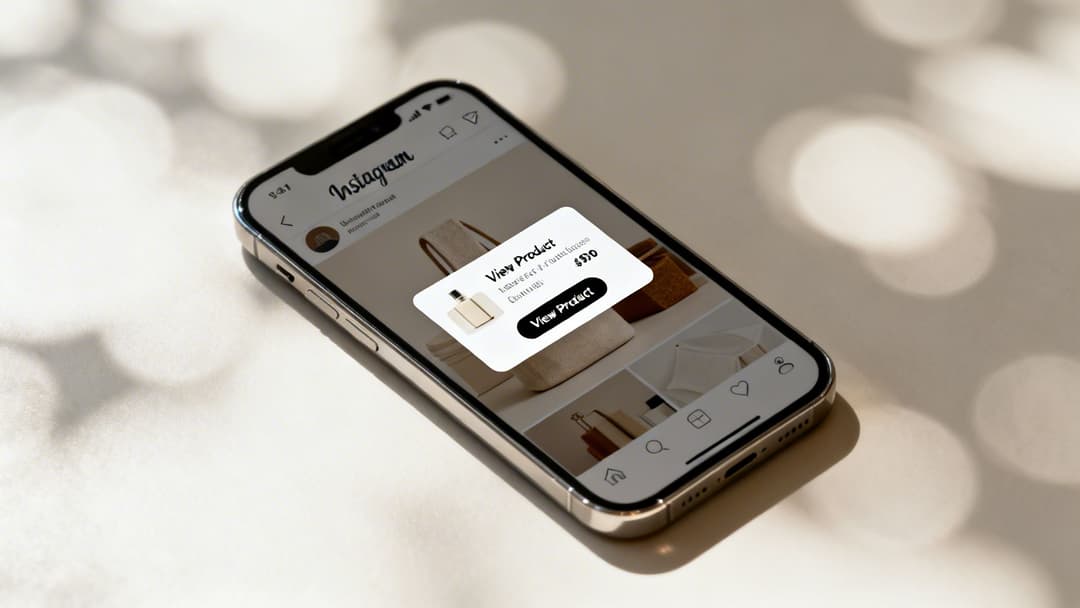
This all starts with product tagging. Think of it as the bridge connecting your beautiful, engaging content directly to your checkout. When someone sees a product they love in a photo, they don't have to leave the app and go on a scavenger hunt. A simple tap reveals the product name and price, instantly closing the gap between inspiration and action.
Master Product Tags Across Every Format
Tagging isn’t just for static feed posts anymore. To build a truly dynamic storefront, you need to use this feature everywhere your audience hangs out on Instagram. Each format has its own vibe and reaches people in a different headspace.
- Feed Posts & Carousels: This is your bread and butter for styled product shots or lifestyle photos. You can tag up to five products per image or a whopping 20 products in a carousel, making it perfect for showcasing a complete look or a product bundle.
- Instagram Stories: The "Product Sticker" is your go-to here. It's incredibly effective for flash sales, behind-the-scenes glimpses, or quick product features that create a sense of urgency.
- Instagram Reels: With video being king, tagging products in Reels is a must. You can tag items as they appear, letting viewers shop without ever pausing the entertainment.
Don't underestimate the power of this. More than 200 million Instagrammers visit at least one business profile daily, and there are 130 million taps on shopping posts every month. People are ready and willing to buy.
To help you get the most out of each feature, here's a quick breakdown of how to use them strategically.
Instagram Shopping Feature Comparison
This table outlines where and how you can use different shopping features to maximize your sales impact.
| Feature | Best Use Case | Pro Tip |
|---|---|---|
| Product Tags | High-quality lifestyle photos, carousels showing multiple products. | Tag products in user-generated content (with permission!) to add social proof and authenticity to your feed. |
| Product Stickers | Behind-the-scenes content, limited-time offers, influencer takeovers. | Use interactive elements like polls ("Which color do you prefer?") alongside the product sticker to boost engagement. |
| Reels Shopping | Tutorials, product demos, styling videos, or "get the look" content. | Pin a comment with a direct question about the tagged product to encourage conversation and drive clicks. |
| Collections | Organizing your shop tab by theme, season, or customer need. | Create gift guides or "Shop the Look" collections that group multiple products together to increase average order value. |
By tailoring your content to each specific feature, you create a more intuitive and compelling shopping experience for your followers.
Curate Collections for a Better Shopping Experience
Just dumping all your products into the Shop tab is like throwing clothes on a messy table. You need to merchandise. The Collections feature in Commerce Manager is how you do it, grouping products into thoughtful, themed categories.
Get creative and think beyond the basics like "Tops" or "Shoes." Build collections that tell a story or solve a problem.
A skincare brand, for example, could create collections like:
- "The 5-Minute Morning Routine"
- "Winter Skin Rehab Kit"
- "Bestsellers Under $50"
These curated sets transform your shop from a simple product grid into a guided journey. You’re not just selling products; you're showing customers you understand their needs.
A well-curated collection is the difference between a catalog and a boutique. It shows you understand your customer's lifestyle, not just their wallet.
Amplify Your Reach with Shopping Ads
Organic reach is fantastic, but paid ads are how you scale. Shopping Ads are the perfect way to merge your content strategy with your growth strategy, allowing you to promote your best-performing shoppable posts to a wider audience.
When you boost a post that already has product tags, you're not just promoting a picture—you're running a direct-response ad that sends people straight to a product details page. It’s a beautifully seamless path from discovery to checkout. You can learn more about how to get around the app and make the most of these features by checking out our guide on improving your Instagram navigation skills.
By combining authentic, shoppable content with the precision targeting of Meta's ad platform, you can reach new, high-intent customers and drive predictable revenue right from your Instagram Shop.
Optimizing Your Shop for Better Performance and ROI
Getting your shop approved and tagging products is a huge milestone, but let's be real—the work is just getting started. Your shop doesn't just exist in a vacuum. To actually drive sales and see a real return, you need to actively optimize your new storefront.
This means shifting your mindset from setup to a continuous cycle of analysis and improvement.
Your first stop should be your Instagram Shopping Insights. Tucked away in your professional dashboard, this is where you'll find the hard data needed to make smart decisions. It tracks exactly how users are interacting with your shoppable content, taking all the guesswork out of the equation.
Using Data to Drive Decisions
Instead of throwing things at the wall to see what sticks, let the numbers be your guide. Pay close attention to these key metrics to get a clear picture of what your audience wants:
- Product Page Views: This tells you which products are catching people's eyes right away from your tags and stickers. If you're seeing a ton of views but not many sales, it might be a sign to revisit your price, product description, or photos.
- Product Button Clicks: This one is huge. It tracks how many people clicked through to your website from a product page, which is a massive signal of purchase intent.
- Saved Products: When a user saves an item, they're essentially bookmarking it for later. This is a powerful indicator of future purchase intent, giving you a ready-made audience for retargeting campaigns.
For performance marketers, this data is gold. These insights directly fuel AI-driven creative testing. Knowing which products get the most views helps platforms like AdStellar AI automatically prioritize those items in dynamic ads, making sure your budget is spent on creative that actually connects with people.
A successful Instagram Shop isn't just a storefront; it's a data goldmine. Every tap, view, and save is a piece of feedback from your audience telling you what they want to buy next.
And the proof is in the numbers. Brands that lean into Instagram Shops see tangible results. Just look at Magnolia Boutique, which saw a 20% revenue increase. In 2024, Instagram was a major player, driving $37.2 billion in global commerce sales with a highly competitive average conversion rate of 1-2%.
Enhancing Your Product Listings
Data tells you what people are looking at. Now you need to optimize why they should buy. Knowing how to improve ecommerce conversion rate is the critical next step to turn those Instagram Shop visitors into actual customers.
Start by taking a hard look at your product presentation. Your listings need to be compelling enough to stop a casual scroller in their tracks and turn them into a confident buyer.
Focus on writing benefit-driven descriptions. Go beyond just listing specs. Instead of just saying "100% cotton," try something like, "Made with breathable, soft cotton for all-day comfort you'll never want to take off." See the difference?
Your visuals are just as crucial. Don't rely solely on clean, white-background product shots. Supplement them with high-quality lifestyle photos and videos. Show your products being used in the real world—a person wearing the jacket on a breezy day, a styled room featuring your decor. This helps customers visualize the item in their own lives, which can make all the difference for your shop's performance.
Of course, tracking these improvements is key. To measure the impact effectively, you might find it helpful to check out our guide on how to calculate return on ad spend.
Common Questions About Setting Up Your Instagram Shop
Running into a snag while setting up your Instagram Shop is pretty common. It can feel like you’ve followed all the steps, but something’s still not clicking. Let's walk through some of the most frequent questions and clear up the confusion so you can get your storefront live.
Why Was My Instagram Shop Not Approved?
Getting that rejection email is a real downer, but don't panic. It almost always boils down to one of a few fixable issues.
The most frequent culprit is a simple misunderstanding of Meta's Commerce Policies. Give them another read-through to make sure you're not trying to sell services, digital downloads, or anything else on their prohibited list. It's an easy mistake to make.
Another big one is domain verification. Meta needs to know the website you're linking to is actually yours. You have to prove you own it inside the Meta Business Manager to build that trust. Lastly, if your account is brand new with just a handful of posts, it might get flagged. Your profile needs to look like a real, established business before you try again.
Can I Sell Products Without a Website?
This is a big question, and the answer is "it depends where you are." While a dedicated e-commerce site is the gold standard, it's not the only game in town for everyone.
For businesses based in the U.S., the Checkout on Instagram feature is a game-changer. It lets shoppers buy your products right inside the app, creating a super smooth experience without ever sending them away.
Even with Checkout on Instagram, you still have to set up your product catalog through Commerce Manager. For most international sellers, a fully functional e-commerce website is still the backbone of the operation and a core requirement.
So, while the front-end experience is seamless for the customer, all the setup still happens on the back end in Commerce Manager. If you're selling outside the U.S., you'll almost certainly need a website to handle the final transaction.
How Do I Fix Incorrect Product Information?
You've launched your shop, and then you spot it: a typo in a product name or the wrong price. It's a common moment of panic, but the fix is straightforward. The key is to remember that you can't edit product details directly on Instagram. You have to go back to the source.
- Using an E-commerce Platform: If you're connected through Shopify or BigCommerce, just log into that platform's dashboard. Find the product, make your edits to the price, name, or images, and save. The changes will automatically sync over to your Instagram Shop, usually within a few hours.
- Using a Manual Data Feed: Did you upload your catalog with a spreadsheet? No problem. Just open that original file, correct the information, and re-upload it to Commerce Manager. This will overwrite the old data and push your updates live.
Ready to turn ad creation from a chore into a competitive advantage? AdStellar AI helps performance marketers generate and test hundreds of ad variations in minutes, not hours. Discover how to scale your Meta campaigns 10x faster at https://www.adstellar.ai.