If you only remember one thing about Instagram photo sizes, make it this: 1080 pixels. That’s the magic number for your image width. Stick to it, and you’ll avoid most of the compression and quality issues that plague so many accounts. For feed posts specifically, the vertical portrait at 1080 x 1350 pixels is your best friend—it takes up the most screen real estate and tends to stop the scroll.
Your Quick Reference for Instagram Photo Sizes
Getting your image dimensions right is one of the foundational pieces of a professional-looking Instagram profile. It’s not just about aesthetics; it’s about control. When you upload an image wider than 1080 pixels, Instagram automatically compresses it, which can soften sharp details. Go too small (under 320 pixels), and the platform will stretch it out, making it look blurry.
Following the recommended sizes means your content shows up exactly how you designed it. No weird cropping, no fuzzy edges, just crisp, clean visuals. This guide is built for marketers and creators who need the right numbers, fast.
Essential Instagram Dimensions
Think of this as your cheat sheet. This quick visual breaks down the most common placements you'll be designing for: the Feed, Stories, and your Profile Photo.
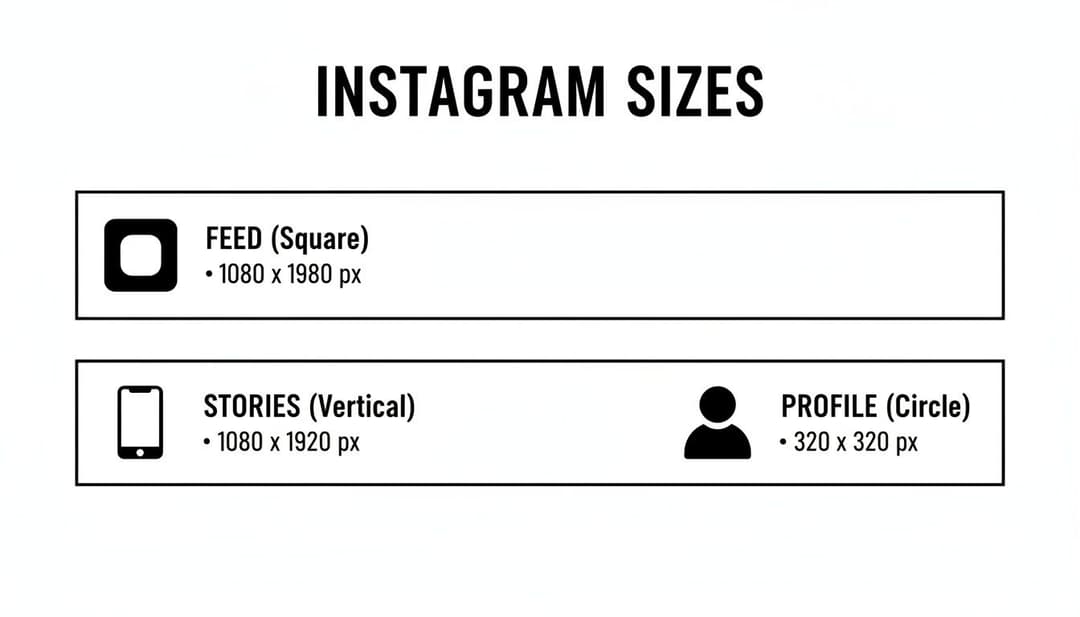
As you can see, each placement has its own ideal orientation. The Feed and Profile photo favor a square format, while Stories are all about that full-screen vertical view.
Of course, dimensions are just the starting point. To truly rock your Instagram account for your online store, you need to pair great sizing with a smart content strategy. But mastering these specs is a critical first step.
Pro Tip: Always export your images in the sRGB color space. Instagram converts everything to this profile anyway, so starting with sRGB from the get-go prevents unexpected color shifts. This ensures your brand colors look consistent once your post is live.
For a more detailed look, the table below breaks down the pixel dimensions, aspect ratios, and best file formats for every major Instagram placement. Whether you're posting a single image, a carousel, or a Reel, these are the numbers you need. And if you're running ads across platforms, you might also find our guide on the ideal size for Facebook ads helpful.
Instagram Photo Size and Dimension Chart
Here's a comprehensive table that summarizes all the key dimensions and formats you'll need. It's the perfect reference to bookmark for quick lookups when you're creating content.
| Placement Type | Recommended Pixels (Width x Height) | Aspect Ratio | Recommended Format |
|---|---|---|---|
| Square Feed Post | 1080 x 1080 pixels | 1:1 | JPG, PNG |
| Portrait Feed Post | 1080 x 1350 pixels | 4:5 | JPG, PNG |
| Landscape Feed Post | 1080 x 566 pixels | 1.91:1 | JPG, PNG |
| Instagram Story/Reel | 1080 x 1920 pixels | 9:16 | JPG, PNG |
| Profile Photo | 320 x 320 pixels | 1:1 | JPG, PNG |
Keep this chart handy, and you'll be well on your way to creating perfectly optimized visuals that look sharp and professional every time.
Getting Your Instagram Feed Post Dimensions Right
The Instagram Feed is where your brand’s visual story really comes to life. While Instagram has opened up to different formats over the years, there are still three main players for feed posts: Square, Portrait, and Landscape. Nailing these dimensions isn't just a technical box-ticking exercise; it's about making sure your content shows up exactly how you planned, without any weird cropping or frustrating quality loss.
Each format has its place, but one is the clear winner for grabbing attention. The whole game is about taking up as much screen real estate as possible to stop someone from scrolling right past your post. That’s why understanding the best size for your Instagram photos is a strategic advantage.
The Three Core Feed Formats
Let's break down the specs for each of the three main feed post types. The most important rule to remember? Keep your image width locked in at 1080 pixels. This is your best defense against Instagram's compression algorithm, which can sometimes get a little aggressive and mess with your image quality.
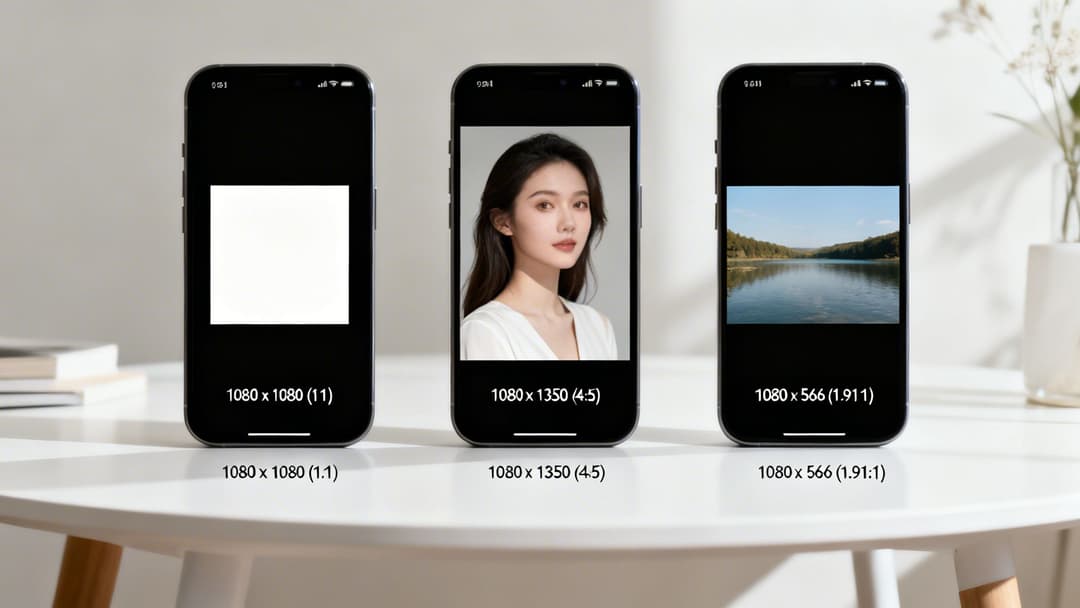
- Square (1:1): The classic, original Instagram format. You’ll want to size these at 1080 x 1080 pixels. It’s still a great choice for centered shots, product close-ups, or any graphic where you want perfect symmetry.
- Landscape (1.91:1): The horizontal option, best for wide shots like sweeping scenic views or big group photos. Use 1080 x 566 pixels. Just be aware that this format takes up the least amount of vertical space on someone’s phone.
- Portrait (4:5): This is the vertical powerhouse and, frankly, the one you should be using most of the time. The optimal size is 1080 x 1350 pixels. It's widely seen as the best choice because it fills more of the mobile screen, which means more eyes on your work.
While all three are available, the Portrait (4:5) format has become the undisputed standard for performance. Its vertical layout is just a natural fit for how we all hold and use our phones, giving your message a much larger canvas.
Why 1080 x 1350 Pixels is the Gold Standard
So, why has the vertical 4:5 ratio at 1080 x 1350 pixels become the industry go-to? It all comes down to maximizing on-screen visibility. In a feed that’s more crowded than ever, every single pixel counts. A taller image simply takes more time and effort to scroll past, which dramatically increases the chance that a user will stop and engage.
Picking the right dimensions has a direct impact on how well your campaigns perform. An image that's sized incorrectly can get automatically cropped by the platform, cutting off important text, your logo, or key product details. That’s a surefire way to hurt your engagement rates.
The 1080 x 1350 pixel size has been the top recommendation for years, and it's so baked into the platform that Instagram's system will automatically compress any image uploaded wider than 1080 pixels. For marketers running paid ads, this is a big deal. Images that don’t fit the 4:5 ratio can lose up to 20-30% of their visual real estate to awkward cropping, which is a direct hit to performance.
Connecting Dimensions to Campaign Success
For performance marketers, sticking to these specs isn't just about making things look pretty; it's about keeping your data clean. When you're A/B testing hundreds of ad creatives, using consistent dimensions means you can be confident that any differences in performance are because of the creative itself—the photo, the copy, the CTA—and not because one ad got butchered by cropping and the other didn't.
This principle is even more critical for complex formats. For example, if you're building multi-image posts, you should check out our guide on carousel Instagram ads to see how these sizing rules extend to each slide. When you standardize your dimensions, you create a solid, reliable baseline for figuring out what actually works with your audience.
Getting Your Instagram Stories and Reels Dimensions Just Right
Vertical, full-screen content is the undisputed king of mobile engagement, and nowhere is that more obvious than on Instagram. For both Stories and Reels, your magic numbers are 1080 x 1920 pixels. This is a perfect 9:16 aspect ratio, designed to completely fill a phone screen and grab a user's full attention. It's an immersive format that just works because it shoves all other distractions out of the way.
Getting this one dimension down is a huge win for anyone managing campaigns at scale. The 9:16 format is the standard across Meta’s entire vertical ad ecosystem—think Stories, Reels, and even those full-screen video ads. This means you can repurpose creatives without a major headache. For platforms like AdStellar AI, where creating ads in bulk relies on consistent, predictable dimensions, this kind of standardization is a lifesaver.
If you’re juggling video assets across platforms, our guide on https://www.adstellar.ai/blog/facebook-video-ad-dimension can give you even more insight into making your content work everywhere.
Staying in The Safe Zones
So, you have the whole 1080 x 1920 canvas to play with, but that doesn't mean every pixel is prime real estate. Instagram slaps its user interface right on top of your content. We’re talking about your profile icon, the reply bar, and all those interactive buttons that pop up at the top and bottom of the screen. If you put your logo, a key piece of text, or your call-to-action in these spots, they’re going to get covered up.
This is exactly why you have to respect the "safe zones." It's not a suggestion; it's a rule you can't afford to break. As a general guideline, just keep all your critical visual elements smack in the middle of the screen. That’s the only way to guarantee they'll be seen.
This template shows you exactly where those pesky UI elements live, so you can see the areas to avoid.
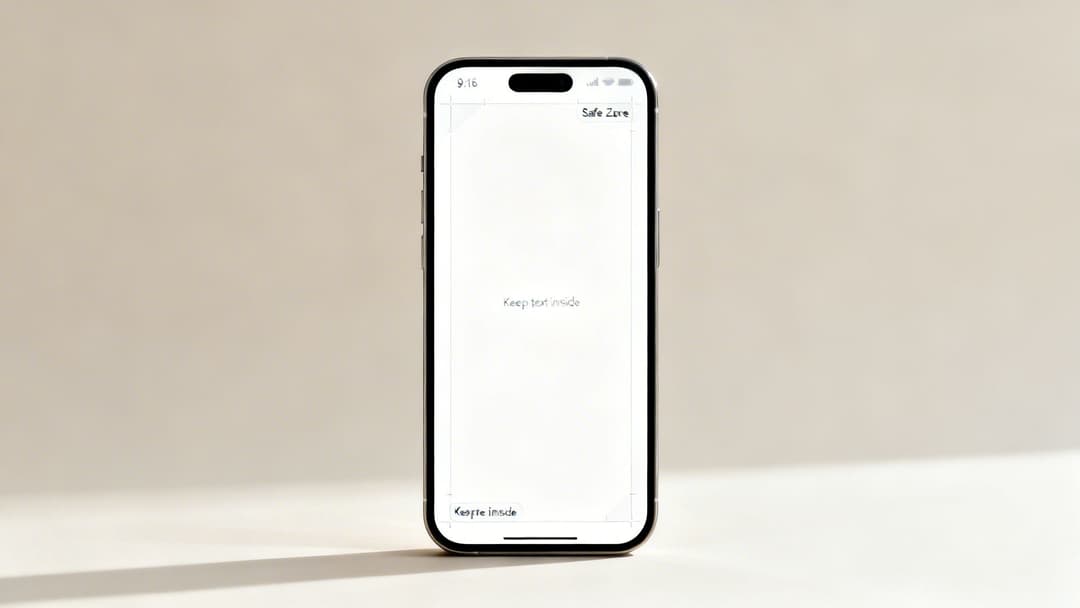
As you can see, the top and bottom chunks of a 9:16 creative are where Instagram's interface sits.
To get really precise, plan on leaving about 14% (roughly 250 pixels) of the top and 20% (around 340 pixels) of the bottom of your image or video completely clear of anything important. This simple practice will save you from creative rejections and make sure your message actually gets across on any device.
Sizing Your Content for Maximum Impact
There's a reason the 9:16 ratio has become the go-to for mobile content—it just aligns with how people naturally hold and use their phones. This vertical-first approach is especially important for marketers because Instagram's algorithm definitely plays favorites with content that’s made for the platform. For example, Reels that stick to the 1080 x 1920 size and are kept under three minutes tend to get a much better push from the algorithm.
When you're figuring out your visual strategy, understanding Reel vs Carousel can help you pick the right format for what you're trying to say and nail the dimensions from the start. By consistently using the right sizes, especially the powerful 9:16 format, you’re basically setting your content up to get the most eyeballs and engagement possible.
Getting Your Instagram Profile Photo Size Right
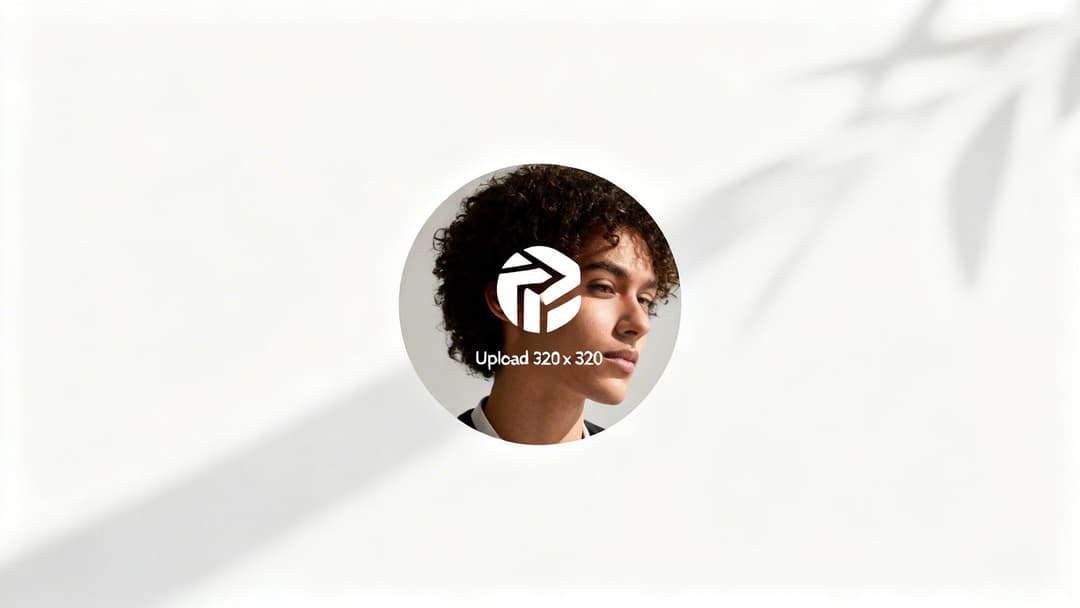
Your profile photo is a tiny but mighty piece of brand real estate. It's often the very first impression you make—whether in comments, DMs, or right on your profile page. To keep it looking sharp everywhere it appears, you should always upload a high-quality image at 320 x 320 pixels.
Sure, Instagram shrinks it down to a much smaller 110 x 110 pixels in the feed, but it keeps the larger version on its servers. This is crucial because when someone taps to view your profile, the image stays crisp and clear instead of becoming a pixelated mess.
Working with The Circular Crop
The single most important thing to remember about your profile photo is Instagram's non-negotiable circular crop. Any details you place in the corners of your square image will be cut off. For brands using a logo, this makes careful composition an absolute must.
To steer clear of any cropping disasters, stick to these simple rules:
- Center Everything: Place the most critical element—your face or your company logo—smack in the middle of your 320 x 320 canvas.
- Leave a Buffer: Think of it as a "safe zone." Leave a generous margin of empty space around the edges so the circular mask doesn't clip off anything important.
- Keep it Simple: The best profile photos are bold and instantly recognizable, even at a tiny scale. Complex details or small text will just become unreadable.
Your profile photo is a core part of your brand identity. A blurry or poorly cropped image can hurt your credibility, while a sharp, well-composed one reinforces professionalism and builds trust at every single touchpoint.
This seemingly small detail can have a real impact on how your audience perceives you. The 320 x 320 spec is one of the most stable on Instagram because the platform is designed to scale it correctly. In fact, consistent, high-quality profile images can boost overall brand recall by around 15-20% among users who check out a brand before engaging. You can dive deeper into other social media image guidelines and find more stats that prove why proper sizing is so critical.
Choosing the Best Export Settings and File Formats
Getting the perfect dimensions is only half the battle. If your export settings are off, even a perfectly sized image can end up looking blurry, pixelated, or discolored after you upload it. This happens because Instagram aggressively compresses every file to save server space, and the best way to control that process is to give it a high-quality, properly formatted file from the start.
Think of it like this: you can have the best recipe in the world, but if you use the wrong ingredients or bake it at the wrong temperature, the result won’t be what you hoped for. Export settings are that final, crucial step to ensure what you see in your design tool is what everyone sees on the feed. Getting this right is especially critical for ad creatives, where clarity and color accuracy can directly impact performance.
JPG vs. PNG: Which File Format Is Best?
The two most common file formats you'll be dealing with for Instagram are JPG (or JPEG) and PNG. They might seem interchangeable, but they have key differences that make one a better choice than the other in specific situations. Knowing when to use each is a simple trick to preserve your image quality.
JPG (Joint Photographic Experts Group): This is your go-to for pretty much any standard photograph. JPGs use a "lossy" compression method, which means they strategically discard some image data to create a smaller file size. This works beautifully for complex images with lots of colors and gradients—like portraits or landscape shots—where the quality loss is usually impossible to spot.
PNG (Portable Network Graphics): Save PNGs for images that need to be razor-sharp. Think logos, infographics, screenshots, or any ad graphics with text and solid blocks of color. PNGs use "lossless" compression, which retains all the original image data, keeping those crisp lines perfectly intact. They also support transparent backgrounds, a major advantage for graphic elements.
For most of your photos, a high-quality JPG is the perfect balance of quality and file size. But for any graphics-heavy content where every line matters, a PNG will always look better.
Your Essential Export Checklist
It doesn’t matter if you’re working in Canva, Figma, Adobe Photoshop, or even AdStellar's bulk creative generator—the core principles for exporting are universal. Before you hit that "download" or "export" button, run through this quick checklist to give your image the best chance of surviving Instagram’s compression algorithm.
Key Takeaway: Always export your images using the sRGB color profile. Instagram automatically converts everything to sRGB anyway, so starting with it prevents any unexpected and jarring color shifts. This ensures your brand colors look exactly as you intended once the post is live.
Here’s a simple, universal checklist for the best results:
- File Format: Choose JPG for photos. Use PNG for graphics with sharp lines, text, or logos.
- Image Size: Set the width to 1080 pixels. For a portrait post, the height should be 1350 pixels (4:5); for a square post, 1080 pixels (1:1); and for Stories, 1920 pixels (9:16).
- Quality/Compression (for JPGs): Aim for a quality setting of 75-85% or "High." This is the sweet spot between file size and visual fidelity, which stops Instagram from crushing it with its own heavy-handed compression.
- Color Space: Double-check that your export setting is sRGB. It’s the standard for the web and exactly what Instagram uses.
- File Size Limit: Try to keep your final image under 30 MB. While Instagram can technically handle larger files, smaller files upload faster and are far less likely to run into weird processing errors.
By following these settings, you’re basically telling Instagram’s algorithm, "Hey, I've already optimized this." That simple step dramatically reduces the risk of the platform applying its own harsh compression, keeping your visuals sharp, vibrant, and professional.
Troubleshooting Common Instagram Image Problems
Even when you follow all the rules for the best size for Instagram photos, things can still go wrong. It’s a classic, frustrating scenario: a perfectly crisp image in your design tool suddenly looks blurry, weirdly cropped, or discolored the second it hits your feed.
This section is your go-to guide for diagnosing and fixing these headaches. Most issues boil down to just a few common culprits: incorrect aspect ratios, aggressive compression, or mismatched color profiles. Once you understand why these errors pop up, you can solve them fast and stop them from happening again.
Why Your Photos Look Blurry or Pixelated
The most frequent complaint is that dreaded loss of sharpness. Your photo looks crystal clear on your computer, but once it’s uploaded, it’s soft and just a little bit fuzzy. This is almost always Instagram’s compression algorithm doing its thing.
The platform automatically compresses any image wider than 1080 pixels. If you upload a massive, high-resolution photo, Instagram has to shrink it down aggressively, which often hurts the quality. On the flip side, uploading an image smaller than 320 pixels wide forces the app to stretch it out, which also causes blurriness.
- The Cause: Your image width is either way too big or way too small.
- The Solution: Always resize your image to a width of 1080 pixels before you upload. This puts you in control of the final quality, leaving less work for Instagram’s algorithm to mess up.
Solving Unwanted Cropping and Black Borders
Seeing your image unexpectedly cropped or framed with black borders is another common problem. This is a dead giveaway that your aspect ratio doesn't match the placement you’ve chosen. For feed posts, Instagram supports aspect ratios from 1.91:1 (Landscape) to 4:5 (Portrait).
If you try to upload an image outside that range—like a super-wide panorama or an extra-tall portrait—Instagram will crop it to fit. If it can’t crop the image cleanly, it will slap on black or white borders to fill the empty space. This not only looks unprofessional but also shrinks your visual real estate. Keeping your content correctly framed is also key to understanding what impressions on Instagram mean for your overall reach.
Quick Fix: Before you even think about uploading, crop your image to a supported aspect ratio. Stick to 1:1 for square, 4:5 for portrait, 1.91:1 for landscape, and 9:16 for Stories and Reels. This one simple step ensures your image fills the frame exactly as you planned.
Correcting Inaccurate Colors
Have you ever uploaded a photo with your brand colors looking vibrant and perfect, only to see them appear dull or slightly off on Instagram? This is almost always a color profile issue. The entire web, including Instagram, displays images in the sRGB color space.
If your image is saved in a different profile, like Adobe RGB or CMYK (which is for printing), Instagram has to convert it. That conversion process isn't always perfect and is often the reason for noticeable color shifts.
Luckily, the solution is simple. Always export your images from your editing software using the sRGB color profile. This step guarantees that the colors you see on your screen are the same ones your audience will see in their feed.
Frequently Asked Questions About Instagram Photo Sizes
Let's be honest, navigating Instagram's photo sizes can feel like trying to hit a moving target. But once you get a handle on a few core principles, it all clicks into place. This section is designed to tackle those specific, nagging questions that always seem to pop up, even after you think you've got it all figured out.
Think of this as your quick-reference guide for solving those last-minute doubts and making sure every single post is pixel-perfect.
How Do I Fit a Picture on Instagram Without Cropping It?
The absolute easiest way to dodge Instagram’s dreaded crop is to size your image to one of its supported aspect ratios before you even open the app. If your photo doesn't fit into a 1:1, 4:5, or 1.91:1 box, Instagram is going to force it, one way or another.
But what if you're committed to a specific composition that doesn't fit? You can always turn to a third-party app like Canva or Snapseed. These tools let you place your image on a correctly sized canvas (like 1080 x 1350 pixels) and add borders to fill in the gaps. This trick preserves your original photo while still playing by Instagram's rules.
Quick Tip: When you're uploading, if Instagram defaults to a square crop, keep an eye out for the small "expand" icon (it looks like two arrows pointing outwards) in the bottom-left corner of the preview. Tapping it will usually snap the view to your image's original aspect ratio, as long as it's within the supported range.
Is the Instagram Grid Preview 4:5 or 1:1?
Your main profile grid—that all-important nine-square preview of your feed—displays every single post thumbnail as a 1:1 square. This is a massive detail to remember, especially if you mostly post taller, vertical 4:5 images.
Instagram automatically generates that 1:1 thumbnail by cropping right from the center of your original image. So, you have to make sure the most critical part of your photo is centered. If your main subject is too high or low in that 4:5 frame, it could get awkwardly decapitated in your grid preview, which can really mess with your profile's aesthetic.
What Is the Best Resolution for Instagram?
For the best possible quality, you should always aim for a width of 1080 pixels. This is the magic number for balancing sharpness with Instagram's aggressive compression. While the app can handle bigger images, it just shrinks them down to 1080px wide anyway, and you lose all control over how it looks in the end.
Here’s a quick breakdown to keep handy:
- Portrait Feed Post: 1080 x 1350 pixels
- Square Feed Post: 1080 x 1080 pixels
- Landscape Feed Post: 1080 x 566 pixels
- Stories & Reels: 1080 x 1920 pixels
Sticking to these resolutions will keep your content looking crisp on pretty much any device. Knowing how to promote an Instagram post effectively really starts with great-looking visuals, and getting the resolution right is step one.
Why Do My Photos Lose Quality on Instagram?
If your photos look blurry, the culprit is almost always compression. Instagram has to compress every image to reduce file size, which helps the platform load quickly for its billions of users. Your image is most likely to get fuzzy if:
- It's too big: Uploading a 4000px wide photo forces Instagram to shrink it down hard, which often leads to softness and artifacts.
- It's too small: An image under 320px wide will be stretched out to fit, causing obvious pixelation.
- The file format is off: For photos, a high-quality JPG is your best bet. A PNG with lots of gradients can have a much larger file size, which just invites more compression from the algorithm.
By resizing to 1080px wide and exporting as a high-quality JPG before you upload, you do most of the heavy lifting for Instagram’s algorithm. This gives it less work to do and helps preserve your photo’s sharpness.
Ready to stop resizing ads and start scaling campaigns? With AdStellar AI, you can generate hundreds of perfectly sized creative variations for Meta in minutes, not hours. Let our AI handle the technical details so you can focus on strategy and growth. Learn how AdStellar AI can launch your Meta campaigns 10x faster.