When you decide to put money behind an Instagram post, you’re standing at a fork in the road. You can take the fast lane with the in-app ‘Boost Post’ button for a quick visibility bump, or you can gear up for a professional campaign using Meta Ads Manager.
One path is built for speed and simplicity. The other offers the kind of granular control that serious performance marketers and growth teams need to drive real business outcomes. Choosing the right one comes down to what you’re trying to achieve right now.
Your Two Paths to Promoting Instagram Posts
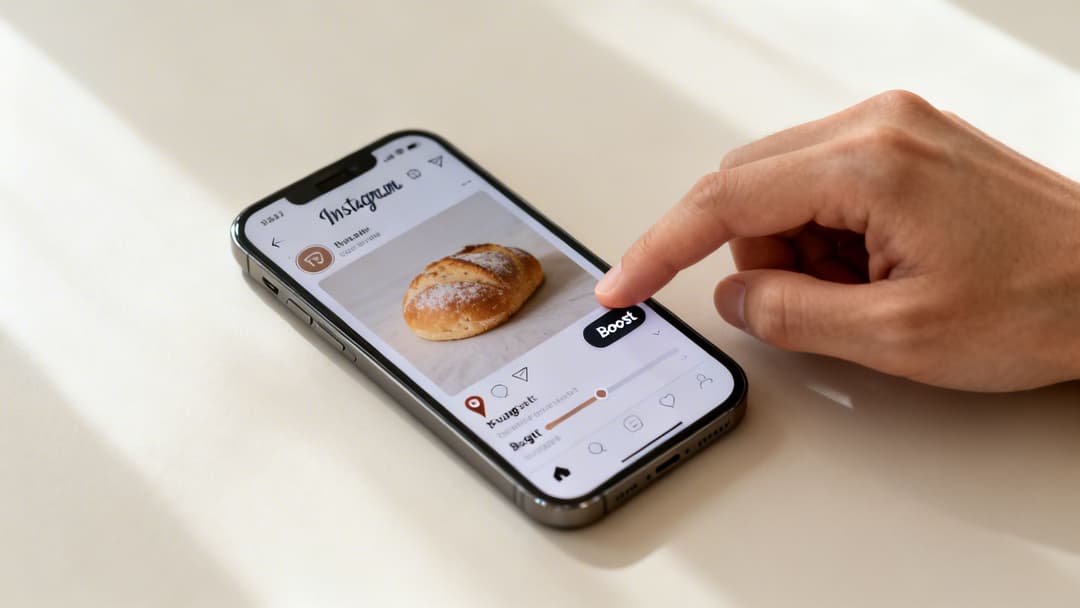
The ‘Boost Post’ button is Instagram’s native, one-click solution. It’s designed to be incredibly straightforward, making it a great option when your goal is simple—like getting more eyeballs on a great piece of content or driving a few more clicks to your profile. Think of it as a megaphone.
On the flip side, you have Meta Ads Manager. This isn’t just a megaphone; it’s a full-blown command center for every ad you run across Meta’s ecosystem, including Instagram. This is where the pros live and breathe. It unlocks a whole different level of strategic capability that the Boost button just can't touch. Of course, any promotion is more effective when it's part of a bigger picture, which is why understanding broader small business social media strategies is always a good starting point.
Boost Post vs Meta Ads Manager At a Glance
Here’s a quick comparison to help you choose the right tool for your immediate advertising goal.
| Feature | Boost Post (In-App) | Meta Ads Manager (Professional) |
|---|---|---|
| Primary Goal | Quick engagement, reach, profile visits | Conversions, leads, sales, app installs |
| Targeting | Basic (location, age, gender, interests) | Advanced (Custom/Lookalike Audiences, retargeting) |
| Creative Control | Limited (promotes existing post as-is) | Full (A/B testing copy, images, headlines) |
| Placement | Instagram Feed, Stories, Explore | All Meta placements (FB, IG, Messenger, etc.) |
| Analytics | Basic reach and engagement metrics | In-depth ROAS, CPA, conversion tracking |
| Best For | Beginners, influencers, local businesses | Performance marketers, e-commerce, B2B |
Ultimately, the Boost button gets you started, but Ads Manager is where you scale.
The Professional's Toolkit: Meta Ads Manager
Meta Ads Manager turns a simple post promotion into a finely tuned component of a larger marketing engine. It’s not about just reaching more people; it’s about reaching the right people and nudging them toward a specific business goal.
Here’s what really sets it apart from a simple boost:
- Precise Campaign Objectives: You move way beyond basic goals. Here, you’re optimizing for actual conversions, generating qualified leads, driving catalog sales, or getting app installs.
- Advanced Audience Targeting: This is the game-changer. You can build Custom Audiences from your website traffic, create powerful Lookalike Audiences based on your best customers, and layer in thousands of detailed demographic or behavioral data points.
- Full Creative Control: You can A/B test different ad copy, headlines, and calls-to-action on the same Instagram post. This is how you discover what truly resonates and drives action.
- Performance Analytics: Forget vanity metrics. Ads Manager gives you access to in-depth reporting dashboards where you can measure what matters, like Return On Ad Spend (ROAS) and Cost Per Acquisition (CPA).
This is a glimpse of the Ads Manager interface, where all this magic happens.
As you can see, the platform provides a granular view of every campaign, ad set, and ad, allowing for real-time tweaks and optimizations. As we break down in our guide on building a paid social media strategy, getting comfortable with this tool is fundamental to achieving measurable growth.
While boosting is wonderfully accessible, mastering Ads Manager is what separates casual posting from building a sustainable, revenue-driving machine on Instagram.
Using the Boost Button for Quick Wins
The “Boost Post” button is your most direct path to getting more eyes on your content. It’s built for speed and simplicity, making it a go-to tool when your main goal is immediate visibility, not complex conversion tracking. This method strips away the dense interface of Meta Ads Manager, giving you a streamlined process right inside the Instagram app.
Think of it as the perfect way to amplify your best-performing organic content. You’ve posted something that’s already getting great engagement, and now you want to pour a little fuel on the fire. This is exactly where boosting shines.
Selecting Your Goal
First things first, you need to tell Instagram what you want to achieve. The app offers a few straightforward objectives designed for immediate action.
- More Profile Visits: This goal is perfect for growing your following and building brand awareness. It sends users directly to your Instagram profile, nudging them to check out your other content and hopefully hit that "Follow" button.
- More Website Visits: If you want to push traffic to a specific landing page, blog post, or product page, this is your best bet. You’ll just need to drop in a URL and pick a call-to-action button like "Learn More" or "Shop Now."
- More Messages: This one encourages people to slide into your DMs. It’s excellent for service-based businesses or for generating leads that require a more personal touch.
Choosing the right goal is everything. A local bakery promoting a new seasonal pastry would probably choose More Profile Visits to attract local followers who might actually visit their shop. On the other hand, an e-commerce brand launching a new collection would go with More Website Visits to drive traffic straight to the product page.
Defining Your Target Audience
After you’ve set a goal, you’ll define who gets to see your promoted post. The in-app options aren’t as granular as Ads Manager, but they’re more than effective for quick campaigns. You can either let Instagram’s algorithm do the heavy lifting or build a simple audience yourself.
The Automatic option is a great starting point. Instagram's algorithm will target people who are similar to your existing followers—a pretty smart way to find a relevant audience with zero manual effort.
If you want more control, you can create your own audience by specifying:
- Location: Target users by country, region, city, or even a specific radius around your business.
- Interests: Add keywords related to your industry, products, or customer hobbies. That local bakery could target interests like "desserts," "coffee," and "bakeries."
- Age and Gender: Narrow your demographics to match your ideal customer profile.
This simplified targeting is what makes the Boost button so accessible. While you’re missing the deep behavioral and custom audience options from Ads Manager, you have more than enough control for straightforward awareness campaigns.
Setting Your Budget and Duration
The final step is deciding how much you want to spend and for how long. You'll set a total budget for the promotion and a duration in days.
Based on these inputs, Instagram gives you an estimated reach—the number of unique accounts your post is likely to be shown to. This is where you have direct control over the scale of your promotion. A small budget of $20 over 4 days might reach a few thousand people, while a larger budget will obviously expand that reach significantly.
This direct link between spend, time, and estimated reach makes it easy to see the immediate impact of your investment. It's a key feature when you need to promote an Instagram post quickly with a predictable outcome. For those curious about how this feature works on other Meta platforms, check out our guide on what the 'Boost Post' feature means on Facebook.
Mastering Promotion with Meta Ads Manager
Let’s be honest. The in-app "Boost" button is a great starting point, but it's not where real performance marketing happens. For that, you need to step into the command center: Meta Ads Manager. This is where you graduate from simply buying a bit of reach to strategically engineering measurable business outcomes.
The level of control you get is what separates vanity metrics from profitable, scalable growth.
Think of it this way: boosting a post is like using a point-and-shoot camera. It’s simple, fast, and gets the job done. But using Ads Manager is like picking up a professional DSLR. Suddenly you have full control over aperture, shutter speed, and focus—everything you need to create a masterpiece. That’s the kind of granular control Ads Manager gives you over your campaigns.
Moving Beyond Basic Goals
The first thing you’ll notice in Ads Manager is the campaign objective selection. Forget vague goals like "more profile visits." Here, you’re forced to choose an objective that maps directly to your actual business funnel.
This is the most critical first step. The objective you pick tells Meta’s algorithm exactly what success looks like, and it will relentlessly optimize delivery to find people most likely to take that specific action.
- Awareness & Reach: Perfect for top-of-funnel campaigns where your only goal is getting as many eyeballs on your ad as possible.
- Traffic: Use this when you need to drive clicks to a website, an app, or a specific landing page.
- Engagement: Optimizes for post likes, comments, and shares. Good for building social proof, but rarely the main goal for performance.
- Leads: Designed specifically to collect information from potential customers, often using Meta’s slick, pre-filled Instant Forms.
- Sales/Conversions: This is the moneymaker. The powerhouse objective for any e-commerce brand, optimizing for purchases, add-to-carts, or any other valuable action on your website.
For any serious performance marketer, choosing a Sales objective for an e-commerce brand or a Leads objective for a B2B company isn't optional. It’s the only way to ensure your budget is spent hunting for people who will actually convert, not just those who might passively double-tap your post.
If you're new to the platform, it's worth taking a moment to understand what Facebook Ads Manager is and how it all fits together.
This simple flow really breaks down the core pillars of building a high-powered ad inside Ads Manager.
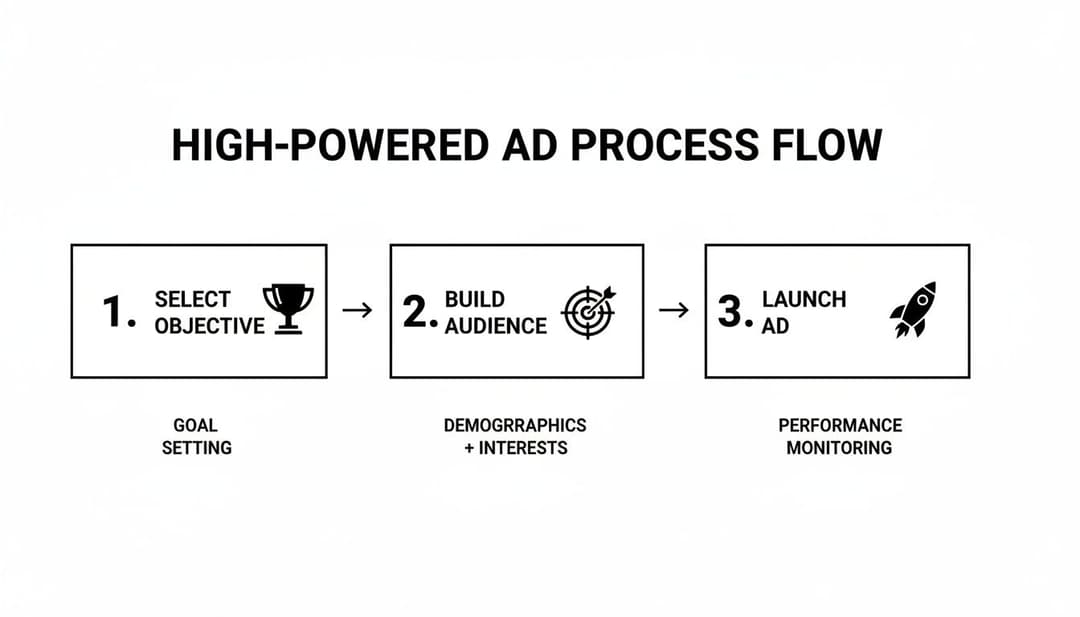
As you can see, success isn't just about hitting "launch." It's a strategic sequence that always starts with a crystal-clear objective and a precisely defined audience.
Building Your High-Value Audiences
This is where the real magic of Ads Manager lives. While boosting offers some basic demographic and interest targeting, Ads Manager unlocks a suite of sophisticated audience tools that let you reach your most valuable customers with terrifying precision.
You can finally stop guessing and start targeting users based on their actual behaviors and their relationship with your brand.
Custom Audiences are built from your own data—these are your warm audiences who already know who you are. The possibilities are huge:
- Website Visitors: Target everyone who hit your site in the last 30 days. Or get super specific and target users who viewed a product but bailed before buying.
- Customer List: Upload a CSV of customer emails or phone numbers, and Meta will find their profiles on Instagram for you.
- App Activity: Retarget users who have taken specific actions inside your mobile app.
- Instagram Engagement: Create an audience of people who have liked, commented on, or saved your previous posts.
Lookalike Audiences are how you find your next million customers. You give Meta a "source" audience (like a list of your best customers), and its algorithm goes out and finds new users who share similar characteristics and online behaviors. A 1% Lookalike Audience is the most precise, finding the top 1% of users in a country who most closely resemble your source.
This is how you promote an Instagram post like a pro. An e-commerce brand could create a 1% Lookalike Audience based on their list of top-spending customers. Then, they can layer that with behavioral targeting for "Engaged Shoppers," ensuring their ad is shown only to new, high-potential buyers.
Advanced Creative and Placement Control
Another massive advantage of Ads Manager is the ability to run an existing Instagram post as an ad while maintaining full control over its presentation and placement. You’re not stuck promoting the post exactly as it appears on your grid.
You can spin up multiple ad variations using the same post as your creative base. This is an absolute game-changer for A/B testing. For example, you could test:
- Different Headlines: Does "Shop Our New Collection" perform better than "20% Off For a Limited Time"?
- Varying Primary Text: Test a long, story-driven caption against a short, punchy one with a clear offer.
- Multiple Calls-to-Action: Compare the conversion rates of "Shop Now" versus "Learn More."
On top of that, you get total control over placements. Instead of letting Instagram’s algorithm guess where your ad should run, you can manually select or deselect every single placement across the Meta ecosystem. You might discover that your post crushes it in Instagram Stories but bombs in the Explore feed. Ads Manager gives you the data and the control to pour your budget only into the highest-performing spots.
This level of optimization is simply impossible with the Boost button, and it's absolutely fundamental to maximizing your Return On Ad Spend (ROAS).
Designing Posts That Are Built to Convert
Throwing money at a promotion is only half the battle. If the post itself—the creative, the copy, the whole package—isn't built to stop the scroll and drive action, you're just paying to amplify mediocrity. To really get results when you promote an Instagram post, your creative needs to be engineered for performance from the very beginning.
Think about it: a promotion is only as good as the post it's amplifying. You can have the most brilliant targeting strategy in the world, but if you pair it with a boring, static image, you're signing up for a sky-high Cost Per Acquisition (CPA) and a disappointing Return On Ad Spend (ROAS).
Embrace Dynamic Formats
The days of relying solely on a single, static image for your paid promotions are long gone. While a beautiful product shot still has its place, dynamic formats like Carousels and Reels consistently run laps around them when it comes to driving real engagement and action.
Take carousels, for instance. We've seen them deliver significantly higher engagement rates compared to single-image posts, which is why they're a cornerstone for any performance marketer trying to maximize reach without blowing up their ad spend. The data backs this up—Meltwater's reports consistently show carousels outperforming single photos for business accounts. It's a key insight for anyone serious about paid promotion.
- Carousels: These are storytelling machines. Use them to show off multiple product angles, demonstrate a "before and after," or walk a user through key features. That interactive swipe keeps people hooked way longer than a static image ever could.
- Reels: Video is still king for grabbing attention in a crowded feed. Promote Reels that are short, punchy, and get straight to the value. They're perfect for showing a product in action or sharing a quick, valuable tip that builds authority.
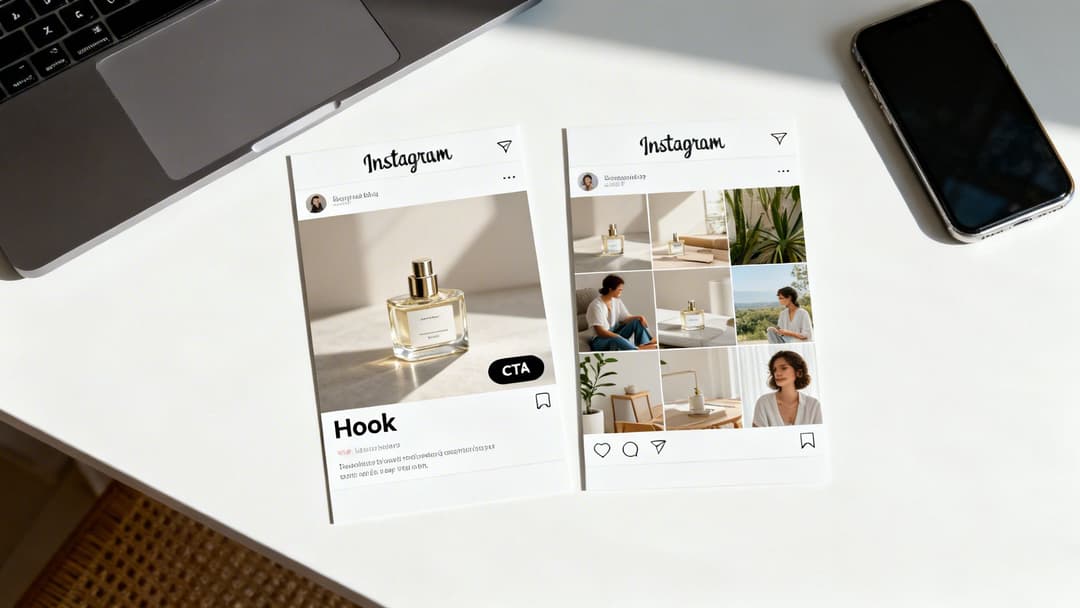
The Power of the First Impression
For any carousel post, that first slide is your hook. It has one job and one job only: to stop the scroll and earn the swipe. This is not the place for your brand logo or a subtle, artsy shot. Make it bold. Make it intriguing. Make it impossible to ignore.
I see this mistake all the time: saving the best content for the last slide. A real performance marketer knows that if the first slide doesn't grab someone in under three seconds, the rest of the carousel might as well not exist.
A killer strategy is to use that first slide to pose a question or make a bold claim. Then, use the following slides to present the solution—your product. This simple narrative structure is infinitely more compelling than just another product gallery.
Integrate Authentic User-Generated Content
Sure, polished, professional content looks great. But authentic User-Generated Content (UGC) builds trust in a way that slick studio shots just can't. Weaving photos or videos from real customers into your carousels or Reels adds a layer of social proof that is pure gold.
Let’s say a skincare brand A/B tests two promotions:
- Ad A: A pristine, studio shot of their product bottle on a marble countertop.
- Ad B: A carousel featuring a real customer's before-and-after photos, a short video testimonial, and a final slide with the product.
In almost every scenario I've ever seen, Ad B will drive a lower CPA and a higher conversion rate. Why? Because it feels real and relatable. Authenticity sells far better than perfection.
Write Direct-Response Copy with a Clear CTA
Your ad copy needs to be just as purposeful as your visuals. Be clear, be direct, and focus on a single outcome. Don't waste time trying to be clever; clarity is what converts. Your caption should work hand-in-glove with your creative to tell one cohesive story.
Here's a simple framework that works:
- Start with a hook that grabs attention.
- Agitate a specific pain point or highlight a key benefit.
- Present your product as the clear solution.
- End with a strong, unmistakable Call-to-Action (CTA). Something like "Shop Now to Get 20% Off" or "Tap the Link to Start Your Free Trial."
Always think about the entire user journey, from that first impression to the final click. If you're looking for more inspiration, check out our guide on designing creative ad campaigns that actually convert. When you design posts with a clear purpose and an irresistible hook, you ensure your ad spend works smarter, not just harder.
Managing Your Ad Spend and Measuring What Matters
Once you’ve launched your promoted post in Meta Ads Manager, the real work begins. Now it’s time to manage your budget like a hawk and track the metrics that actually move the needle for your business. The first step to building a profitable promotion engine? Ditching vanity metrics like likes and comments for good.
Think of your budget as the fuel for your campaign. How you let the algorithm spend it determines whether you’re driving a high-performance race car or just burning cash.
Campaign Budget Optimization vs. Ad Set Budgets
You’ve got two main ways to handle your spend: at the campaign level or at the ad set level. The right choice really hinges on your strategy and how much hands-on control you want.
- Campaign Budget Optimization (CBO): This is the "set it and forget it" approach, in a good way. You set one master budget for the entire campaign, and Meta’s algorithm automatically funnels more money to your top-performing ad sets in real-time. For most performance marketers, this is the go-to method because it’s all about efficiency. You let the algorithm do the heavy lifting.
- Ad Set Level Budgets (ABO): This route gives you full manual control. You assign a specific daily or lifetime budget to each individual ad set. It’s super useful when you absolutely need to guarantee spend on a certain audience—maybe you're in a testing phase or doing a targeted regional push—even if it isn't your most efficient performer.
For instance, a DTC brand launching a new product might start with ABO. They could assign a fair $50/day to both their "cold" lookalike audience and their "warm" retargeting audience to gather clean data. Once a clear winner emerges, they can flip the switch to CBO and let Meta pour fuel on the fire, scaling the budget toward that high-performing ad set.
Scaling Winners and Cutting Losers
Promoting an Instagram post effectively means knowing when to double down on a winner and when to mercilessly cut a loser. You'll want to start with a modest test budget, just enough to get statistically significant results. I find that $20-$50 per day per ad set is usually a good starting point.
Give it a few days, then dive into the data. Is an ad set hitting your target Cost Per Acquisition (CPA)? Great. Start scaling the budget. A solid rule of thumb is to increase the budget by 20-30% every 2-3 days. This gradual increase helps you avoid shocking the algorithm and resetting its learning phase. On the flip side, if an ad set is just burning through your money with no conversions, kill it. No hesitation.
The goal isn’t to make every single ad a home run. The goal is to quickly find the few that are and pour your resources into them. This disciplined approach is what separates profitable campaigns from expensive experiments.
Focusing on Performance Metrics That Matter
Likes are nice, but they don't pay the bills. A seasoned performance marketer is obsessed with the metrics that tie directly back to revenue and growth.
Your Ads Manager dashboard needs to be customized to put these KPIs front and center:
- Cost Per Acquisition (CPA): This is your north star. It tells you exactly what it costs to land one customer or lead. Your entire optimization strategy should revolve around driving this number down.
- Return On Ad Spend (ROAS): For any e-commerce brand, this is the ultimate measure of success. It calculates the revenue you generate for every single dollar you spend on ads. A 3x ROAS means you made $3 for every $1 spent.
- Conversion Rate (CVR): This is the percentage of people who clicked your ad and actually completed the desired action, like making a purchase. A low CVR might signal a problem with your landing page or the offer itself.
Don’t underestimate the power of different placements, either. Instagram Stories, for example, is a massive driver of both engagement and sales, accounting for a quarter of the platform's ad revenue. In 2022 alone, Stories ads pulled in $15.95 billion worldwide, making them a non-negotiable placement for most brands. As a performance marketer, you should be dissecting the CPA from Stories versus your Feed placements. You might find your average conversion rate of 1-2% is much higher in this format, a trend backed up by recent Instagram statistics.
Getting a handle on your ad spend is a deep topic. To dive deeper into what you can expect to pay, check out our complete guide on Instagram ads cost. By zeroing in on these core metrics, you'll shift from simply boosting posts to building a predictable, scalable customer acquisition machine.
Amplifying Your Promotions with Influencer Content
Pairing your paid promotion strategy with influencer marketing is like pouring rocket fuel on your campaigns. It’s not just about getting a creator to post about you; it's about taking their authentic, high-trust content and putting real ad spend behind it. This blend of credibility and scale can absolutely crush your acquisition costs.

The real magic here is social proof. When an ad shows up in the feed from a trusted creator instead of a faceless brand, the message just hits different. We consistently see higher engagement and better conversion rates with this approach compared to standard brand-created ads.
Two Core Methods for Influencer Amplification
You have two main ways to turn influencer content into high-performing ads, and each has its own strategic advantages.
Branded Content Ads: This is the most authentic play. You get permission to promote a creator's post directly from their Instagram handle. The ad appears with the influencer's profile picture and name, but with a "Sponsored" tag. This keeps the native feel completely intact and leverages the creator's built-in credibility to the max.
Influencer Content as Creative: With this method, you license the rights to the influencer’s content—their video, images, you name it—and run it as the creative in your own ad campaigns, from your brand's handle. You get more control over the copy and calls-to-action for A/B testing, but you do lose some of that organic feel from the creator's account.
Imagine a SaaS company partners with a well-known industry expert on an insightful Reel. Using the branded content ad approach, they could promote that Reel to a lookalike audience of their best customers, driving a wave of high-intent demo sign-ups.
Why This Strategy Works
Putting ad spend behind influencer content almost always outperforms traditional ads in pure ROI. It’s not just a hunch; the numbers are pretty staggering. A reported 94% of organizations see at least 2x returns from their influencer collaborations.
The data backs it up even further: 90% of marketers find sponsored influencer content gets better reach than their own brand posts, and 83% see better conversions. You can dig into more of these social media stats on Sprout Social's research page.
When you run paid ads with creator content, you're essentially putting your money where their mouth is. You’re validating their recommendation while targeting new, highly relevant audiences with a message that's already been endorsed by a trusted source. It’s a perfect fusion of third-party validation and precision targeting.
Got Questions About Instagram Promotions?
If you're running paid promotions on Instagram, you've probably run into a few tricky situations. It happens. Here are some of the most common questions that pop up for performance marketers and the straight answers you need.
Can I Edit a Post After I've Already Promoted It?
The short answer is no. Once a post is live with a promotion behind it, Instagram locks the original organic post. You can't change the caption, swap out the image, or edit the video.
If you spot a typo or need to make a change, the only way forward is to delete the promotion entirely. After that, you can edit the organic post and then set up a brand new promotion from scratch. It's a crucial workflow detail to get right before you hit launch.
Why Did My Instagram Promotion Get Disapproved?
It's frustrating, but it almost always comes down to violating one of Meta's Advertising Policies. Rejections are usually triggered by a few usual suspects:
- Restricted Content: Trying to promote things like tobacco, weapons, or certain supplements is a non-starter.
- Misleading Claims: If your ad sounds too good to be true ("Get rich overnight!"), it'll get flagged.
- Poor Creative Quality: Super blurry images or low-resolution videos can get your ad denied.
- Landing Page Problems: Your destination URL has to work, and it needs to be directly relevant to what your ad is offering.
Always check the specific reason Meta gives you in your account notifications. Fix the issue, and then you can resubmit it for another review.
Pro tip: Save yourself a headache by checking your ad copy and creative against Meta's policies before you even start building the campaign. A five-minute check can save you hours of back-and-forth and get your ads live faster.
What's a Good Starting Budget to Promote a Post?
There's no single magic number, but here's a solid framework.
If you're running a more controlled test in Meta Ads Manager, a budget of $20 to $50 per day for each ad set is a great place to start. This gives you enough runway to collect meaningful performance data in a few days without breaking the bank.
For a simple in-app boost, you can go even smaller. Kicking things off with $5 to $10 per day is often enough to just test the waters and get a feel for your potential reach and engagement.
Ready to stop the manual grind and launch winning Meta campaigns 10x faster? AdStellar AI automates bulk ad creation, identifies top performers with AI-driven insights, and helps you scale your most profitable campaigns with a single click. Discover how performance marketers are unlocking more revenue from their ad spend. Learn more and get started at https://www.adstellar.ai.