When it comes to Instagram Stories, getting the dimensions right is everything. The magic numbers you need to remember are 1080 x 1920 pixels. This isn't just a random suggestion—it's the key to making your content look professional and polished.
Sticking to these dimensions gives you a perfect 9:16 aspect ratio, which means your Story will fill the entire screen on most smartphones. Get it wrong, and Instagram’s algorithm will unceremoniously crop or zoom in on your creative, potentially cutting off your message or making your brand look amateurish.
Your Quick Guide to Instagram Story Dimensions
So, why are these specific measurements so important? The vertical 9:16 format is the gold standard for full-screen mobile viewing. It’s been this way since Instagram first launched Stories back in 2016, a move that basically cemented vertical video as the go-to for mobile-first content.
If you upload a photo or video that doesn't fit, you're leaving the final look to chance. Important text, logos, or calls to action could get chopped off, completely ruining the experience for your audience. The infographic below breaks down the specs you need to know.
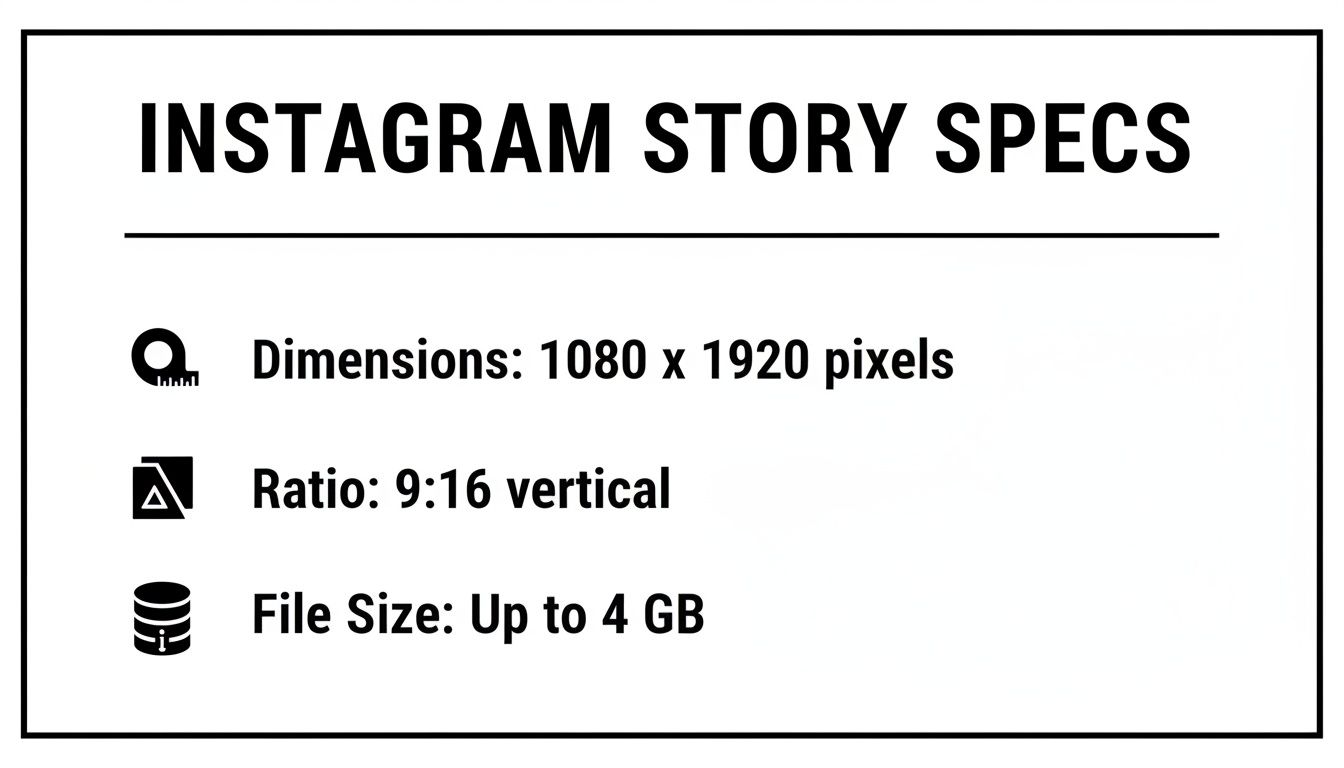
Think of this visual as your go-to cheat sheet. It reinforces the most critical details you need to get your content right every single time, ensuring what you design is exactly what your followers see.
While getting your Story dimensions down is crucial, don't forget about your main feed. If you need help with that, check out our guide on the best size for Instagram photos.
Getting to Grips with Core Instagram Story Specs
Alright, let's get into the nitty-gritty. If you want your Instagram Stories to look polished and professional, you have to nail the fundamentals. The single most important rule is the size of your Instagram story: 1080 pixels wide by 1920 pixels tall.
Think of these dimensions as your canvas. This specific size creates the immersive, full-screen experience that makes Stories so effective. It also locks you into the 9:16 aspect ratio, the undisputed standard for vertical, mobile-first content. Stray from this, and Instagram’s algorithm will take matters into its own hands—cropping, zooming, or adding ugly black bars. Your beautiful design will end up looking awkward and amateurish.
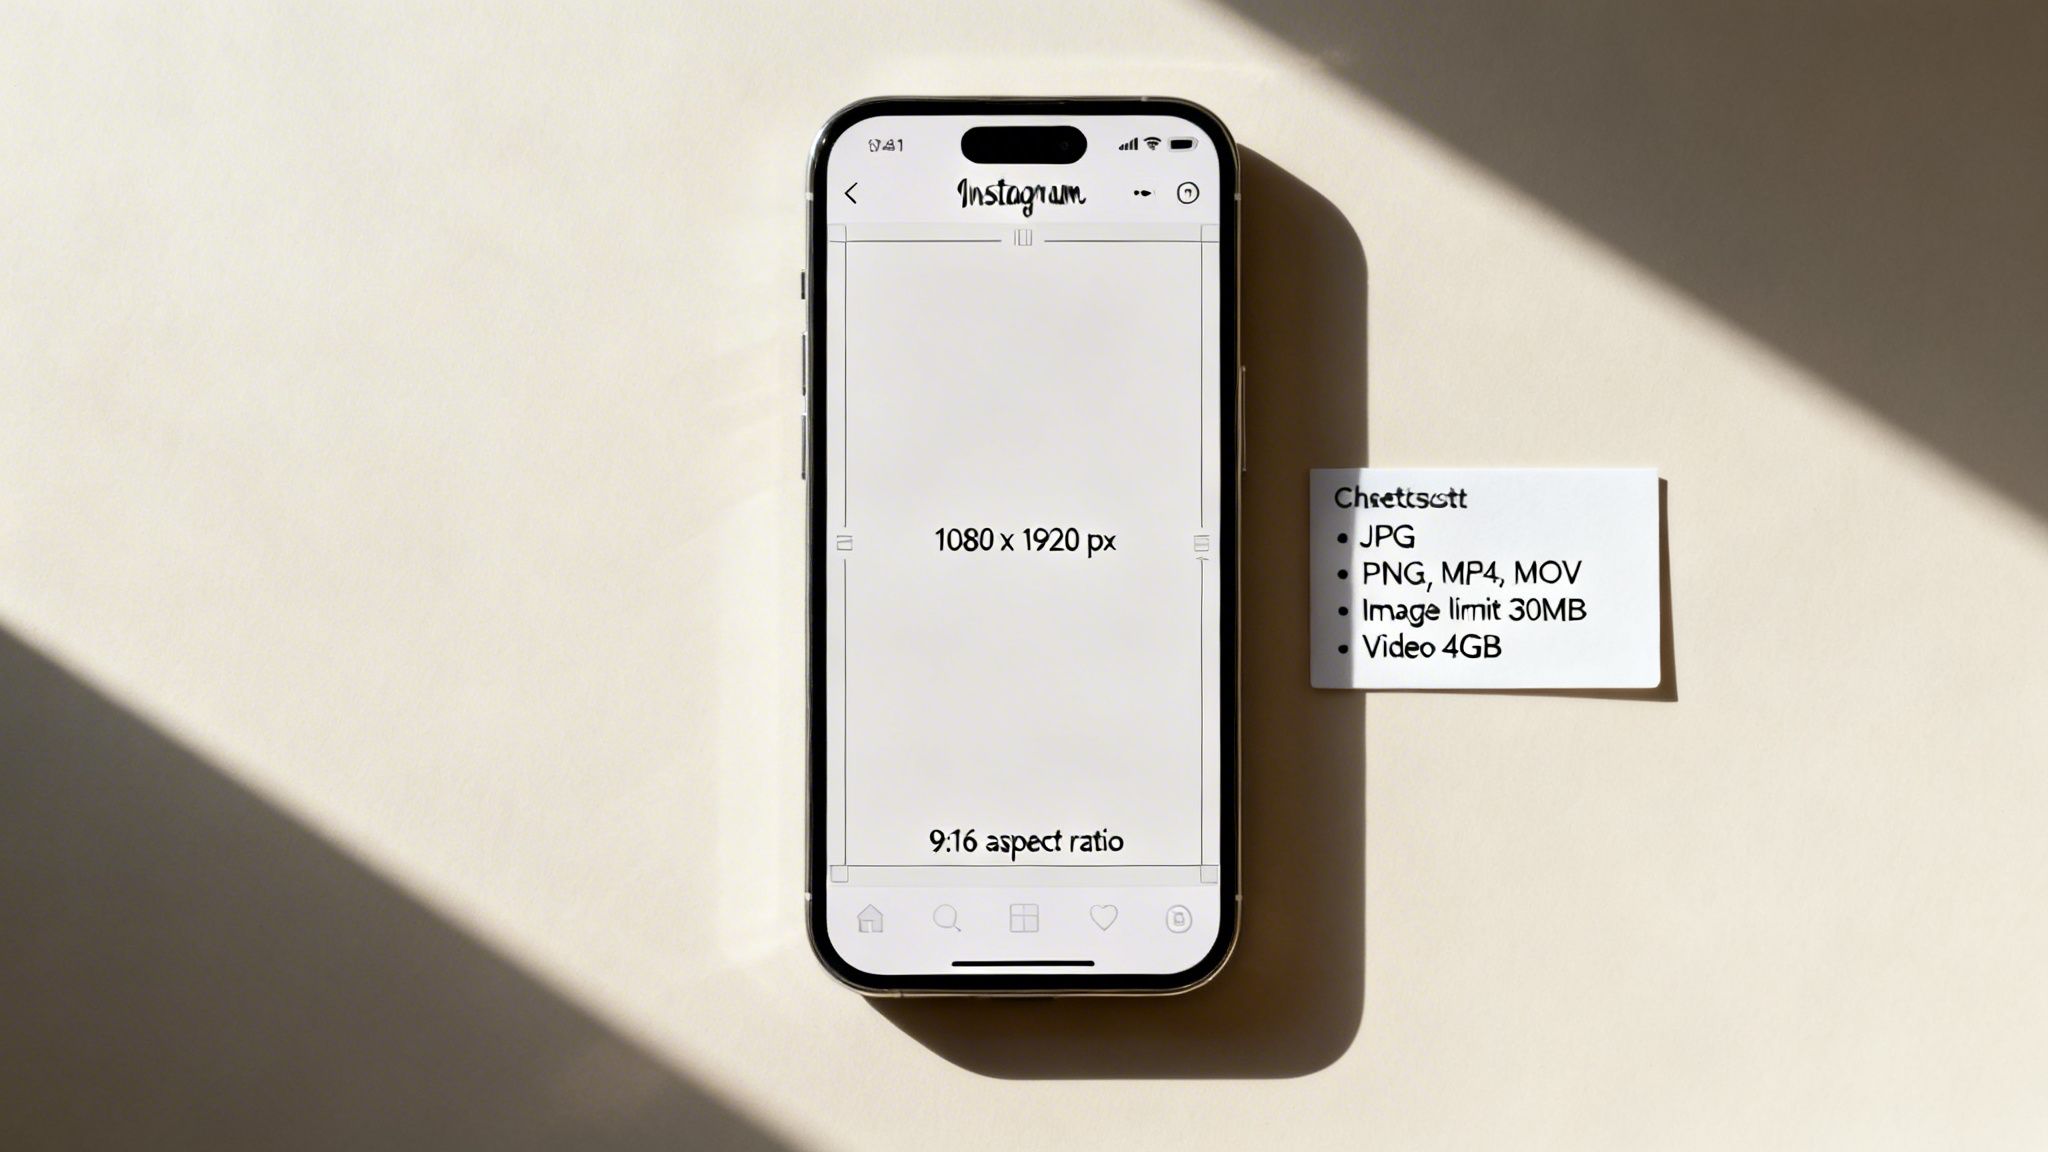
File Formats and Size Limits
Getting your dimensions right is half the battle; the other half is making sure your file plays nicely with Instagram. Sticking to the right formats and sizes is non-negotiable if you want to avoid frustrating upload errors.
When it comes to video, here are the rules of the road:
- File Types: You can use MP4 or MOV. We strongly recommend sticking with MP4, as it offers better compression and is universally compatible across more devices.
- Max File Size: Your video file must be under 4 GB. Honestly, for a 60-second clip, you’ll rarely come close to this limit.
And for static images, the guidelines are just as straightforward:
- File Types: JPG and PNG are your options. Use JPG for photos and complex images, and choose PNG when you need a transparent background or have graphics with crisp lines and text.
- Max File Size: Keep your image under 30 MB. This is more than enough for a high-resolution graphic.
Key Takeaway: Just remember this: MP4 for video, JPG/PNG for images. Respecting the size limits is a simple habit that will save you from the headache of failed uploads and ensure your content looks exactly as you intended.
Finally, let's talk about time. Each individual Instagram Story clip can run for a maximum of 60 seconds. If you upload a longer video, Instagram will automatically chop it up into consecutive 60-second segments for you. Knowing these core specs—from pixels to file types—is the foundation for creating Stories that look sharp, load correctly, and grab your audience's attention from the very first frame.
Mastering the Instagram Story Safe Zone
You’ve nailed the perfect 1080x1920 pixel design for your Instagram Story. The visuals are stunning, the copy is sharp, and you’re ready to post. But once it goes live, you realize your brilliant call-to-action is completely hidden by the "Send message" field.
This is a classic—and entirely avoidable—mistake. While the canvas is 1080x1920, a good chunk of that screen real estate gets covered by Instagram’s own interface. Getting this wrong is one of the quickest ways to torpedo your Story’s performance.
Think about it: the top of the screen is automatically stamped with your profile icon and username. The bottom is even more cluttered, especially for accounts with swipe-up links or the new link sticker. This is precisely why understanding the "safe zone" isn't just a good idea; it's essential.
Defining the Safe Zone Boundaries
As a solid rule of thumb, you need to leave a buffer of roughly 250 pixels at the top and another 250 pixels at the bottom. This leaves you with a central sweet spot of 1080x1420 pixels where your most important content is guaranteed to be seen.
Pro Tip: Treat those top and bottom 250-pixel strips as no-fly zones for anything critical. This means your logo, key text, poll stickers, or any clickable elements need to sit comfortably inside that central 1080x1420 area.
Following this simple guideline ensures your CTAs are actually tappable and your message gets across without being obstructed. It’s a fundamental best practice that applies whether your Story is an organic post or a paid ad.
Why This Matters for Engagement
Imagine spending your budget on a gorgeous ad with a "Shop Now" button that nobody can see. Users can't click what's hidden behind the reply bar, which translates directly to wasted ad spend and lost conversions.
Respecting the safe zone isn't just about aesthetics; it's about making your content work.
- Visibility: Your core message and branding look professional and stay completely unobstructed.
- Click-Through Rate: When users can actually see and tap your links and CTAs, your performance naturally improves.
- Accessibility: Clear, visible content prevents user frustration and creates a much smoother experience for your audience.
Getting the safe zone right is just as important as any of the technical specs. You can dive deeper into creating user-friendly layouts in our guide to Story navigation and design. Ultimately, designing for the safe zone means you're designing for results.
Recommended Export Settings For Perfect Quality
Getting your dimensions right is a great start, but it’s only half the job. If you botch the export, all that careful design work goes down the drain. The result? A pixelated, compressed mess that makes your brand look amateur. Trust me, I’ve seen it happen too many times.
To keep your final video or image looking sharp and professional, you need to stick to a specific set of export settings.
For any video work, the undisputed king of codecs is H.264. It strikes the perfect balance between high quality and manageable file size, which means your content looks fantastic without taking forever to upload. It’s the industry standard for a reason and the safest bet for Instagram Stories.
When you’re exporting, you’ll come across bitrate options, which have a direct impact on how your video looks.
Expert Tip: For a crisp 1080p video, your target bitrate should be around 3,500 kbps (or 3.5 Mbps). Dipping much lower will introduce noticeable compression artifacts, but going way higher is just overkill—Instagram will compress it anyway, so you won’t see any real benefit.
Fine-Tuning Your Video and Audio
Beyond the codec and bitrate, a few other tweaks will make sure your final export is perfectly aligned with what Instagram wants to see. Nailing these details helps you avoid weird glitches and ensures smooth playback for your viewers, which all adds up to a much better experience.
To get that flawless motion and sound, lock in these video and audio settings:
- Frame Rate: Set both your project and your export to 30 FPS (Frames Per Second). Instagram can handle up to 60 FPS, but 30 FPS is the reliable sweet spot that guarantees a smooth look.
- Audio Codec: Stick with AAC (Advanced Audio Coding). It’s the go-to audio format for all MP4 videos.
- Audio Bitrate: An audio bitrate of 128 kbps is all you need. It delivers clean, high-quality sound without adding unnecessary bulk to your file.
Mastering these technical specs is a huge piece of the puzzle. Of course, even the most perfectly exported Story needs a solid strategy behind it to actually perform. You can dive deeper into building winning campaigns in our guide on using video for advertising. When you combine flawless export settings with a smart strategy, your Stories won’t just look good—they’ll get results.
Using Story Analytics to Refine Your Strategy
 Getting the size of your Instagram Story just right is a great start, but it’s only half the battle. If you really want to drive results, you need to look past the technical specs and dig into what your audience actually cares about. This is where the real work—and the real success—begins.
Think of your Story analytics as a roadmap. Instead of just guessing what content will land, you can use cold, hard data to see what’s working and what’s falling flat. This isn’t just about making better creative; it's about making your ad spend smarter.
Unlocking Key Performance Metrics
Once you start digging into your analytics, you'll uncover some fascinating patterns in how people engage with your content. For professional accounts, Instagram offers a deep well of historical information—up to 2 years of Instagram Stories data, which is a massive advantage for spotting long-term trends and finding your winning formula. If you want to dive deeper, you can learn how to access historical Instagram data on Sotrender.com.
To get started, keep an eye on these core metrics:
- Reach: The number of unique accounts that viewed your Story.
- Impressions: The total number of times your Story was seen.
- Forward Taps: People skipping ahead. This often signals a loss of interest.
- Back Taps: Viewers going back to re-watch. This is a fantastic sign of strong engagement.
- Exits: The number of people who swiped away from your Stories altogether.
A high number of exits on one particular slide is a huge red flag. It tells you exactly where you lost your audience's attention, giving you a precise data point to analyze and fix for next time.
By tracking these numbers, you can pinpoint exactly where your content shines and where it stumbles. For instance, you might discover that Stories with polls get way more back taps and fewer exits. That insight is gold, helping you shape future content that truly resonates. To brush up on the fundamentals, check out our guide on the difference between reach and impressions on Instagram.
Using Stories to Boost Engagement and Grow Your Audience
Getting your Instagram Story dimensions right is just the first step. The real magic happens when you use that perfectly formatted space to connect with a massive, highly engaged audience. The quick, disappearing nature of Stories creates an authentic feel—a sense of intimacy and urgency you just don't get from the main feed. It’s an incredibly powerful tool for growing your brand.
Think of it as a direct line to your followers. With over 500 million people jumping into Stories every single day, it’s a feature that has completely dominated the platform, especially with younger crowds. In fact, a whopping 31% of daily Story users are between 18 and 24, a goldmine for many brands. You can dig into more of Instagram's user data on their help page if you want the full breakdown.
Turning Views into Real Action
Just posting content and hoping for the best won't cut it. You have to know what's actually working, and that means paying attention to the right metrics.
- Replies and Sticker Taps: These are your bread and butter. When someone replies to your Story or taps on a poll, quiz, or slider, they're actively engaging. It's proof your content is hitting the mark.
- Link Clicks: If you have the link sticker feature, this metric is gold. It tells you exactly how well your Stories are driving people to your website, product pages, or blog posts.
By tracking these numbers, you move past just counting views and start to understand why people are sticking around or what’s making them swipe away. This is the data that helps you refine your creative and make a genuine impact.
Of course, nailing the technical specs is only part of the puzzle. To really make your mark, you need a solid engagement strategy. For a deeper dive, check out these comprehensive guides on how to get more engagement on Instagram. And if you're ready to explore even more growth tactics, our guide on how to promote on Instagram has you covered.
Got Questions? We’ve Got Answers.
Even seasoned pros run into the same few snags with Instagram Stories. Getting the specs just right can feel like a moving target, but it usually boils down to a few key details.
Let's clear up the most common questions we get from designers and marketers about aspect ratios, quality loss, and those tricky safe zones.
What Is the Best Size for an Instagram Story?
Let's cut right to it. The magic numbers you need are 1080 pixels wide by 1920 pixels tall. This gives you the perfect 9:16 aspect ratio that's built to fill up an entire modern smartphone screen.
Nailing this size from the very beginning is your best defense against weird cropping or those ugly black bars. It ensures what you design is exactly what your audience sees.
Why Does My Instagram Story Look Blurry or Cropped?
Ah, the most common frustration of them all. If your Story looks fuzzy or cut off, it’s almost always one of two things: Instagram's compression or the wrong aspect ratio.
- Blurriness is a side effect of Instagram’s aggressive compression. To fight back, export your videos using the H.264 codec and aim for a bitrate of around 3,500 kbps. This gives the algorithm better data to work with, resulting in a crisper final product.
- Cropping happens when your image or video isn't in that mandatory 9:16 aspect ratio. If you upload something that doesn't fit, Instagram will automatically zoom in and crop it to fill the screen, often cutting off vital parts of your creative.
Key Reminder: Always, always start your work on a 1080x1920 canvas. This one simple habit prevents 99% of cropping issues before they even start.
Can I Post a Video Longer Than 60 Seconds to My Story?
Yes, you can. If you upload a video longer than the 60-second limit, Instagram will automatically slice it into a series of consecutive 60-second clips for you.
A word of advice, though: just because you can doesn't always mean you should. Viewer attention drops off a cliff. For better engagement, it’s almost always a better strategy to edit your video down into shorter, punchier segments that keep people tapping for more.
What Is the Instagram Story Safe Zone?
The safe zone is the "no-fly zone" for your most important content. It's the central area of the screen where your text, logos, or CTAs won't get covered up by Instagram's own interface elements—like your profile icon up top or the message reply bar at the bottom.
As a rule of thumb, keep all your critical elements about 250 pixels away from both the top and the bottom edges. This ensures your message is always seen, no matter what.
Ready to stop guessing and start scaling your Meta ad campaigns? AdStellar AI automates ad creation, identifies winning creatives with AI-driven insights, and helps you launch hundreds of data-backed variations in minutes. Ditch the tedious manual work and unlock more revenue. Explore the platform at https://www.adstellar.ai.